The Iron Horse Stable: Giving Your Engines a Home

Welcome to April! We’ve spent the last few months building the “Family Empire” from the ground up. We broke the circle to create our first siding, and last month, we gave our trains a job by introducing trackside commerce. But after a long day of hauling freight and moving commuters, where do your locomotives go to rest?

Just like a real-world car needs a garage and a gas station, your scale locomotives need a dedicated space for refueling, light repairs, and protection from the “elements” (even if those elements are just household dust!). This month, we’re exploring The Iron Horse Stable. Whether you run classic steam or modern diesel, creating a maintenance facility is one of the most rewarding ways to add realism and “character” to your model railroad.


1. Why Every Railroad Needs a “Stable”

In the golden age of railroading, locomotives were the most expensive assets a company owned. Leaving a multi-million dollar machine out in the rain wasn’t an option. Maintenance hubs—known as Engine Terminals—were the heartbeat of the line.

Integrating a stable into your layout serves three major purposes:

  • Operational Variety: It creates a new “mission.” Instead of just stopping at a factory, your train now has to navigate back to the terminal for “service.”
  • Visual Storytelling: A weathered engine house suggests a history of hard work.
  • Protection: Keeping your engines inside a building when not in use helps keep dust off the delicate gears and electronic decoders.

2. The Steam Era: Coal, Water, and Sand

If your “Family Empire” features steam locomotives, your maintenance facility is a sensory experience. Steam engines are “living” machines that require three primary things to keep moving: Fuel (Coal or Oil), Water, and Sand.

The Water Column

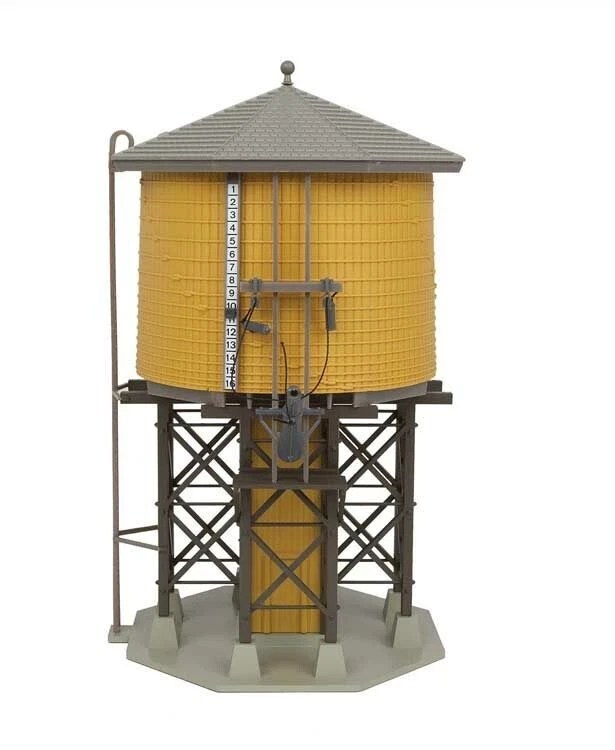
A steam engine is essentially a giant teakettle on wheels. It “exhales” water as steam, meaning it needs constant refills. A Water Column or a Cedar Water Tank is an essential trackside feature.

  • Educational Tip: On real railroads, water tanks were spaced roughly every 10–15 miles!
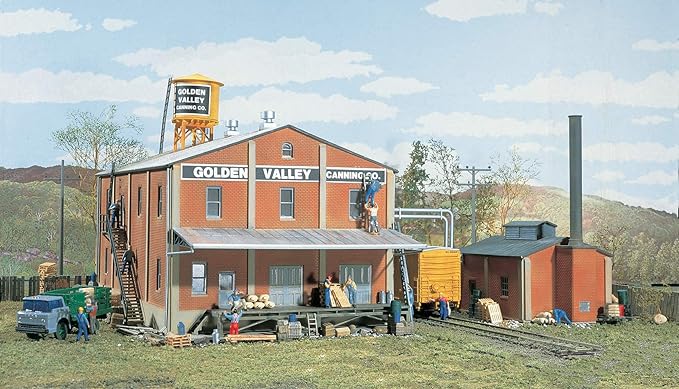
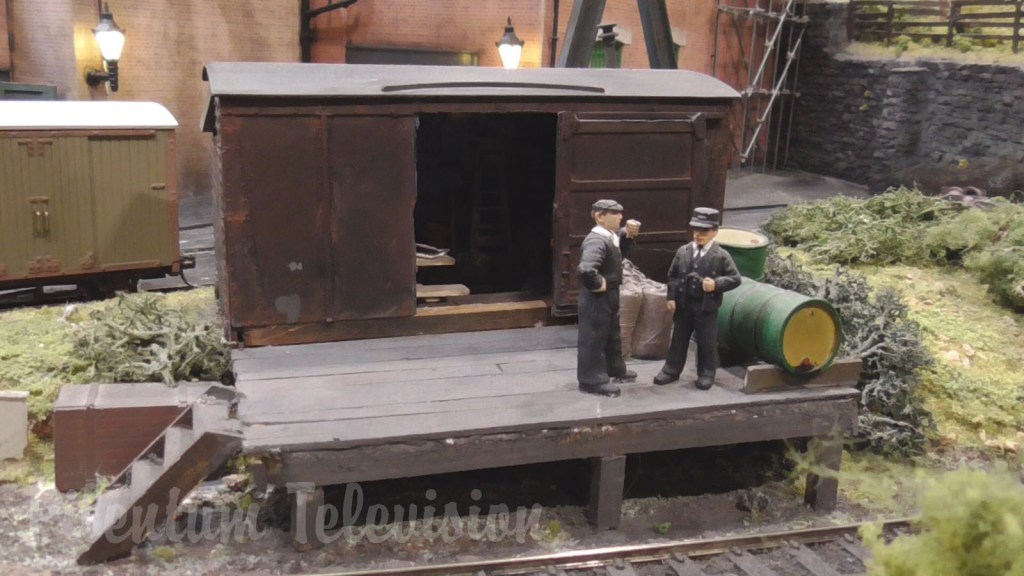
The Coaling Station

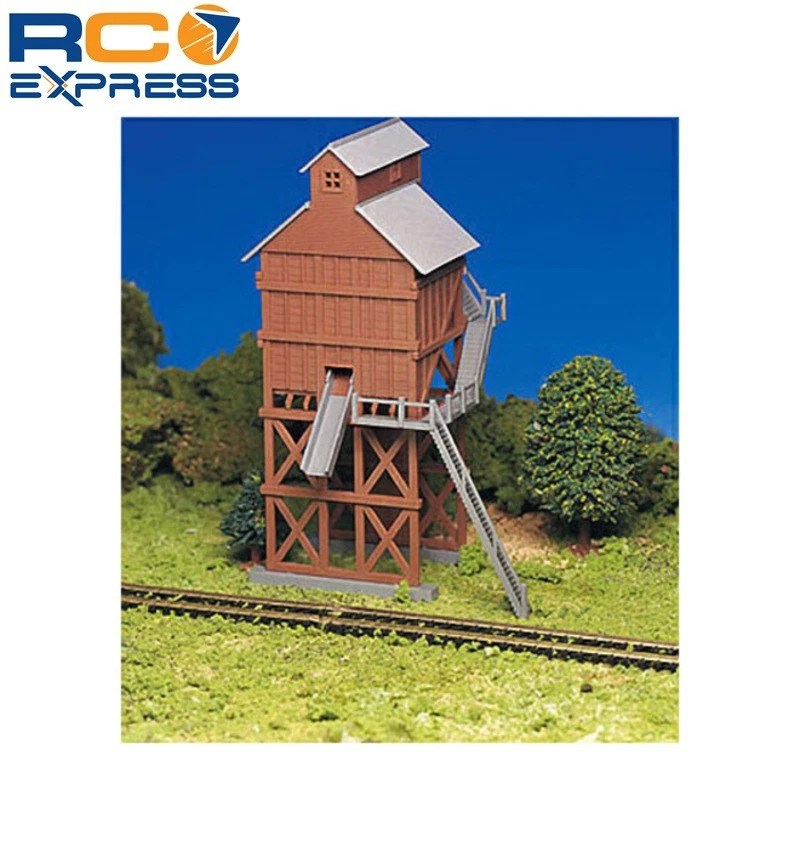
Whether it’s a massive concrete tower or a simple wooden trestle, the coaling station is where the energy comes from. For a beginner layout, a Small Wooden Coaling Tower kit provides a great vertical element that doesn’t take up much space.

The Sand House

Why sand? To gain traction! When a heavy train tries to start on a steep grade or slippery wet rails, the engineer drops sand onto the tracks in front of the wheels. A small “Sand House” and drying tower is a charming, tiny detail that adds immense realism.


3. The Diesel Era: Fuel Pads and Sanding Towers

If your railroad is set in the modern era, your “stable” looks a bit different. Gone are the coal piles, replaced by the industrial efficiency of diesel service.

The Fueling Pad

Modern diesels refuel at a concrete pad equipped with fuel cranes (large hoses). This is an easy feature to model! You can create a “concrete” pad using a piece of styrene painted grey, and add a few fuel crane details.

The Modern Sanding Tower

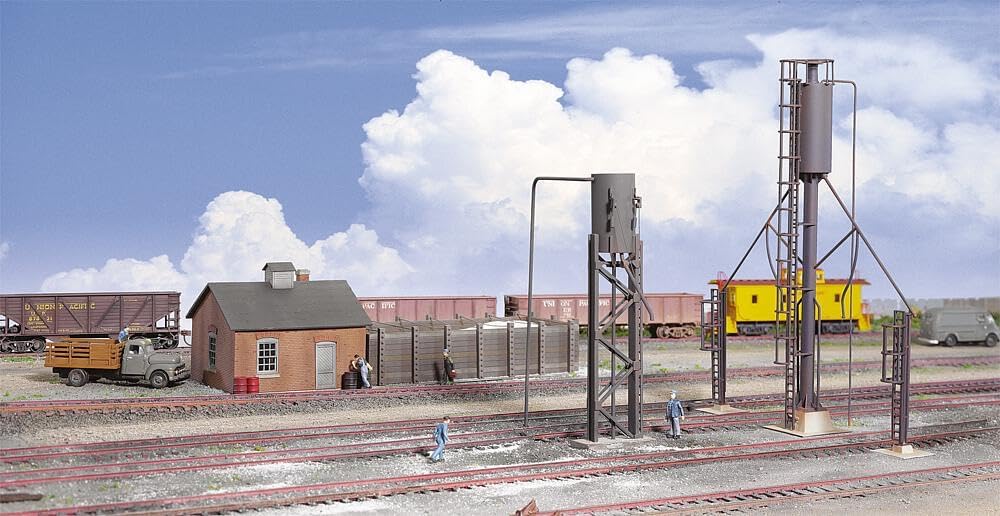
Diesels still need sand! Modern sanding towers are usually tall, thin steel structures. They are often painted silver or safety yellow and provide a great contrast to the dark colors of locomotives.


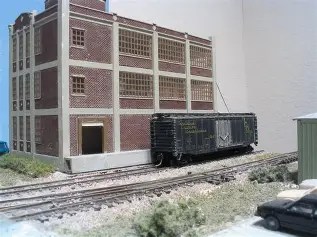
4. The Engine House: The Heart of the Stable

Regardless of the era, the Engine House is the star of the show. This is the “garage” where light repairs happen.

  • For the Small Layout: A Single-Stall Engine House is perfect. It fits at the end of a siding and provides a clear “end point” for your workday.
  • For the Growing Layout: A Two-Stall House allows you to keep your primary freight engine and your passenger engine side-by-side.

Choosing the Right Kit

When selecting your engine house, check the “clearance.” Some older steam-era houses have doors that are too narrow or short for modern, “high-cube” diesel locomotives.

  • The Pikestuff Engine House kits are fantastic for modern modelers because they are “kitbash-friendly,” meaning you can easily combine two kits to make a longer building for those big “6-axle” locomotives.

5. Maintenance: Treating Your Engines Right

“Maintenance” isn’t just a building you look at—it’s something you do. To keep your “Family Empire” running smoothly for years, your locomotives need a little TLC.

Keep the Rails Clean

The number one cause of “stuttering” trains is dirty track. Before you park your engine in the stable for the night, run a track-cleaning block or a lint-free cloth with a drop of 91% Isopropyl alcohol over the rails.

Lubrication (Less is More!)

Locomotives have tiny moving parts. Every 50 hours of “run time,” a tiny drop of plastic-compatible oil on the gear journals is all you need.

  • I highly recommend the Labelle Lubricants Starter Kit. It includes the specialized oil and grease needed for model trains without damaging the plastic parts.

The “White Glove” Treatment

When moving your engines from the track to the stable, try to handle them by the “fuel tank” or the solid chassis rather than the delicate plastic handrails on the top. This prevents “detail parts” from snapping off.


6. Layout Planning: Where Does the Stable Go?

The most realistic place for your Engine Terminal is near the turnout where your trains enter or leave the “main line.” This represents the “Lead Track.”

In a real railroad, engines “dwell” here while waiting for their next assignment. By placing your stable in a visible corner of your layout, you create a “display case” where your favorite engines can sit and look their best even when they aren’t moving.


Summary: Your May Project Checklist

Ready to give your iron horses a home? Here is your “Stable” shopping list:

  1. An Engine House kit (sized for your locomotives).
  2. Fueling/Coaling details (depending on your era).
  3. A Sanding Tower.
  4. A Maintenance Kit (Oil, grease, and track cleaner).
  5. Scenery details (Oil drums, spare wheelsets, and “Work in Progress” figures).

Giving your locomotives a place to rest completes the cycle of your railroad. It turns a collection of models into a functional transportation system with a beginning, a middle, and an end to every workday.

Coming in June: Now that the engines are serviced, it’s time to talk about the people! Join us for “The Miniature Citizen,” where we’ll discuss how to choose, paint, and place figures to bring the human element to your Family Empire.


The First Industry: Giving Your Model Railroad a Job

Welcome to April! Last month, we celebrated a huge milestone in our Family Empire series: Breaking the Circle. You moved beyond the simple loop of track and laid down your first turnout, creating a dedicated siding. It was a proud moment of construction, but now that the glue has dried and the ballast is set, your layout might feel a little… quiet.

Your locomotive is idling on that new siding, and you’re probably wondering, “Now what?”

In the world of model railroading, a train without a destination is just a toy moving in circles. To turn your layout into a living, breathing transportation system, you need commerce. This month, we’re moving from construction to business. We’ll explore how to choose the right building, where to place it for maximum realism, and how to give your siding its very first “job!”


Why Your Layout Needs an Industry

In the “real world,” railroads don’t build track just for the scenery; they build it to move goods. Every siding you see alongside a main line exists because a customer needs something delivered or shipped.

By adding an industry to your siding, you transform your hobby from running trains to operating a railroad. * Purpose: Instead of just driving around, you are now “delivering a load of grain” or “picking up lumber.”

  • Challenge: “Spotting a car” (lining it up perfectly with a loading door) requires skill and slow-speed precision.
  • Storytelling: A weathered factory or a bustling rural elevator tells a story about your layout’s history.

Step 1: Choosing Your “First Industry”

The beauty of model railroading is that you can build whatever you imagine. However, for your very first trackside customer, I recommend choosing a “kit” that is recognizable and fun to build.

The Versatile Warehouse

For those starting out, a classic Walthers Cornerstone Series building is a gold standard. Their kits, like the North Island Refinery or a simple Freight House, are designed specifically for HO and N scales with high detail that fits almost any era.

  • Compatible Rolling Stock: Most warehouses use the humble Boxcar. If you don’t have a reliable one yet, the Bachmann Trains Silver Series Boxcars are excellent, budget-friendly options that track beautifully on new sidings.

The Vertical Icon: The Grain Elevator

If you want a building that stands tall and defines the horizon, look for a Grain Elevator kit. These are fantastic because they have a small “footprint” (they don’t take up much table space) but add significant visual height to your scenes.


Step 2: Strategic Placement (The “Sweet Spot”)

Now that you have your building, don’t just glue it down! Placement is where the magic happens. You want to create a scene that looks natural and functions smoothly.

The Loading Dock Alignment

The most common mistake is placing the building too far from the track. For a realistic look, the loading dock should be close enough to the rails that a miniature worker could bridge the gap with a small ramp.

Tip from Stan: Use your widest piece of rolling stock to test the clearance. Slide the car along the siding past the building. It should be close, but you don’t want the paint to scrape! To ensure your tracks are perfectly spaced, a Rix Products Rail Gauge is a “must-have” tool in my toolbox for checking clearances.

Leave Room for “The Rest”

An industry isn’t just a building; it’s a site. When placing your building, ensure there is room for:

  • Truck Access: Is there a road leading to the other side?
  • Worker Parking: Even a tiny gravel lot made of fine-sifted real dirt or Woodland Scenics Ballast makes a huge difference.

Step 3: Giving the Siding a Job

Once the building is in place, it’s time to write the “job description.” This is the beginning of Operations. Let’s say you chose a warehouse. Here is how you create a “job” for your train:

  1. The Inbound Move: Your locomotive pulls a boxcar from the main line. This car is “loaded” with supplies.
  2. The Spot: You slowly back the car into your new siding, aligning the boxcar door perfectly with the warehouse door.
  3. The Unload: In your mind, that car stays there for a “shift” (perhaps until your next hobby session).
  4. The Outbound Move: On the next run, your locomotive returns, hooks up to the “empty” car, and pulls it away to be taken back to the “rest of the world.”

Enhancing the Scene: The Little Details

To truly move from “construction to commerce,” you need the signs of life. These small touches are what make a model railroad feel real:

  • Weathering: Industrial buildings are rarely pristine. A simple Weathering Powder Kit can add years of “soot” and “grime” to a plastic roof in minutes.
  • Signage: A bold company name gives your layout an identity.
  • Pallets and Crates: Scatter a few miniature pallets near the loading dock. It signals to the viewer that work is happening here.
  • Figures: Place one or two workers on the dock. It provides scale and a sense of activity.

Looking Ahead: Building Your Empire

By adding your first industry, you’ve officially transitioned from a “train collector” to a “railroad superintendent.” You’ve mastered the circle, conquered the turnout, and now you’ve established your first commercial customer.

The best part? This is just the beginning. As you add more sidings, you create more jobs. Eventually, your “switching” moves will become a complex, rewarding puzzle of logistics.

Share Your Progress!

Did you choose a weathered coal mine or a bustling city warehouse? We want to see your first industry! Tag us on Pinterest or your favorite social spot with #TheFamilyEmpire to show off your new trackside business.


Coming Next Month…

Now that your trains have a reason to move, they need a place to go when the workday is over. Join us in May for “The Iron Horse Stable,” where we’ll discuss engine houses, fueling stations, and how to treat your locomotives to the maintenance they deserve.

Until then, keep those wheels turning!


Quick Reference: Top Beginner Industries

IndustryPrimary Car TypeWhy it Works
Grain ElevatorCovered HopperIconic look; small footprint; great height.
Lumber YardFlatcar / CenterbeamGreat for colorful loads; very easy to detail.
Freight HouseBoxcarThe “Swiss Army Knife”; fits any era or town.
Fuel DealerTank CarAdds variety with piping and vertical tanks.

“So You Got a Train Set for Christmas — What’s Next?”

So you got a train set for Christmas—congratulations, and welcome aboard. Right now, it might be a simple oval of track on the floor or around the tree, but that little train can become the start of a lifelong hobby filled with creativity, family time, and imagination. With a few easy steps, your holiday train can grow into a miniature world that you and your family build together.

This series, “So You Got a Train Set for Christmas — What’s Next?”, is designed for families and brand‑new hobbyists who are curious but not sure where to begin. Each month, you will learn something new: how to set up your trains so they run smoothly, how to choose a basic layout, how to add scenery and buildings, and how to turn a simple starter set into a small railroad that tells a story. Everything will be explained in everyday language, with family‑friendly projects you can enjoy on a weekend afternoon.

You do not need to be a “train expert” to follow along. If all you know is that there is a train running in a circle and your children (or grandchildren) love watching it, you are in the right place. Over time, you will discover how to make your layout more reliable, more realistic, and more personal—step by step, at your own pace, and within a budget that works for you.

Think of this series as your guidebook. Some articles will focus on practical topics like track, power, and storage; others will explore creative areas like scenery, buildings, and planning stories for your trains to tell. By the end of the year, you will look back at your original Christmas train and be amazed at how far you—and your railroad—have come.


From Box to First Run: Getting Your Christmas Train Set Up Safely

So the big day is over, the wrapping paper is (mostly) cleaned up, and there it is: a brand‑new train set that has already made a few laps around the Christmas tree. Now comes the fun part—turning that gift into something your family can enjoy safely and confidently, not just for a day or two, but all winter long.

This first article in the “So You Got a Train Set for Christmas — What’s Next?” series will walk through the journey from unopened box to smooth, safe first run. Everything is explained in everyday language, with simple, family‑friendly steps you can follow even if this is your very first experience with model trains.


Step 1: Unboxing Your Train Set

Before anyone plugs anything in or snaps pieces together, take a few minutes to explore what is inside the box. This slows the rush just enough to prevent frustration later.

  • Lay out all the pieces on a table or clean floor: locomotive (the engine), train cars, track sections, power pack (or controller), and any small accessories like signs or figures.
  • Compare what you see to the contents list in the instruction sheet. If anything important is missing—especially track pieces or the power pack—it is better to spot that now and contact the seller than to discover it halfway through setup.
  • Keep small bags and twist ties until the train has made its first successful run, in case something needs to be repacked or exchanged.

This is a great time to let kids “name” the locomotive or pick a favorite car. Giving the train a personality makes the whole project feel more like a shared adventure than just a toy on the floor.


Step 2: Understanding the Basic Parts

You do not need to know all the technical terms to enjoy a train set, but a quick introduction to the main components will make the rest of the process easier:

  • Locomotive: The engine that pulls everything. It usually has more weight and more wheels than the other cars and may have a plug or socket for power on one end.
  • Rolling stock: The train cars—boxcars, passenger coaches, tank cars, or whatever came with the set. They all rely on the locomotive for movement.
  • Track: Curved sections form the loop, straight sections extend it, and sometimes there are turnouts (switches) that let the train change paths.
  • Power pack/controller: The “brain” that feeds electricity to the track. A simple set usually has a knob to go faster or slower and a direction switch.
  • Power wires: Small wires that connect the power pack to a special piece of track (often called a terminal track).

Explaining these parts to children in simple terms—“the engine,” “the cars,” “the road,” and “the controller”—helps them feel included and reduces the temptation to tug or twist something out of curiosity.


Step 3: Choosing a Safe, Flat Surface

Next, decide where this first layout will live. Even if you are just setting things up for a test run, the surface you choose can make the difference between smooth running and constant derailments.

Good options include:

  • A sturdy dining or folding table
  • A clean hardwood or laminate floor
  • A large piece of plywood set on top of low storage boxes

Try to avoid thick carpet or uneven surfaces, which can cause bumps and gaps in the track joints. If carpet is the only option, lay a thin board, foam sheet, or even a large cardboard panel under the track to create a more solid base.

A few quick safety tips:

  • Keep the layout away from high‑traffic walkways where people might step on the track.
  • If you have very young children or pets, consider setting up on a table or using a low barrier (like a temporary baby gate) to protect the layout when no one is actively playing.

Step 4: Assembling the Track

Most train sets are designed to assemble into a simple oval or circle the first time you use them. Follow the diagram in the instructions, but do not be afraid to let kids help with the “puzzle.”

Key points to keep in mind:

  • Make sure each rail joiner (those small metal clips at the ends of the rails) slides fully onto the next piece. A joiner that is halfway on one rail and halfway off the other can cause derailments and power issues.
  • Listen for a soft “click” if the system uses integrated roadbed track; it is a sign that the pieces are properly locked together.
  • Work your way around the loop, gently pressing joints together and occasionally running a fingertip along the rail tops to feel for steps or misalignments.

At this stage, resist the urge to get fancy with extra curves or switches. A simple, smooth loop is the best teacher—and the most reliable—for your first day.

For more train accessories check HERE.


Step 5: Connecting the Power Safely

With the track assembled, it is time to power it—but slowly and thoughtfully.

  1. Find the terminal track piece.
    This is usually a section with a small plug or screws for the power wires. Place it where the wires can easily reach the power pack without stretching across a walkway.
  2. Connect the wires.
    • Match the plugs or screw terminals as shown in the instructions.
    • Make sure bare wire ends are fully secured so no loose strands can touch each other or anything else metal.
  3. Place the power pack.
    • Put it on a stable surface where it will not fall or get stepped on.
    • Keep the cord away from water and out of paths where someone might trip.
  4. Plug into the wall last.
    Do not plug in the power until everything is connected to the track and the controller is turned to “zero” or “off.” This way, the train will not suddenly lurch when power is applied.

If you are using a modern starter set that includes a safety‑listed power supply, it will usually have built‑in protection, but basic common sense—dry hands, no overloaded outlets, and keeping drinks away from the layout—still goes a long way.


Step 6: Placing the Train on the Track

Now for the moment that everyone looks forward to: putting the locomotive and cars on the rails.

  • Start with the locomotive:
    • Carefully set the wheels so they rest in the grooves of the rails, not on top of them.
    • Look from the side at rail level; all wheels should be seated and parallel to the track.
  • Add one or two cars:
    • Hook them to the locomotive using the couplers at the ends of each car.
    • For your first run, fewer cars make it easier to spot problems.

Encourage children to handle the train gently, using two hands and grasping the body of the locomotive instead of pulling on small detail parts or couplers.


Step 7: Your First Test Run

With everything in place, it is time for the big moment.

  1. Make sure everyone is ready and that nothing is touching the track.
  2. Double‑check that the controller knob is at zero or the lowest speed.
  3. Plug in the power pack.
  4. Slowly turn the knob until the locomotive begins to move.

Watch the first few laps closely. This is not just exciting; it is also an important test.

Look for:

  • Smooth movement without sudden stops or jerks.
  • Cars that follow the locomotive without wobbling.
  • No spots where the train slows noticeably (which might signal a loose track joint or dirty connection).

If the train derails, do not panic. Simply stop the power, gently move the derailed car back onto the rails, and inspect that section of track for gaps or bumps. Fixing small issues together—“What do you think went wrong here?”—turns problems into teachable moments rather than frustrations.


Step 8: Troubleshooting Common First‑Day Issues

Every new train set has a learning curve, but most problems have simple causes and easy fixes.

  • Train does not move at all:
    • Confirm the power pack is plugged in and turned on.
    • Check that the wires are firmly attached to the terminal track.
    • Jiggle the locomotive slightly to ensure it has good contact with the rails.
  • Train starts and stops randomly:
    • Inspect track joints for loose or crooked sections.
    • Gently press rails together where you see gaps.
    • Check that the terminal track is securely attached and not lifting off the surface.
  • Frequent derailments on the same piece of track:
    • Look for a kink or height difference between the rails.
    • Make sure that piece is not twisted or bent.
    • Try rotating the piece or replacing it with a different section if your set includes extras.

Treat these issues as part of the fun, not as failures. Kids often enjoy becoming “junior engineers” who help solve the mysteries of a stubborn curve or a bumpy joint.


Step 9: Setting Simple Family Rules for Safety and Care

Before the first evening ends, it helps to agree on a few “engineer rules” to keep the train running well and everyone safe:

  • Only adults plug or unplug the power pack.
  • Trains must be turned off before they are lifted from the track.
  • No leaning on the table or stepping on the board the trains are on.
  • After each running session, someone is responsible for checking that the power is off and cords are safely out of the way.

These rules do not have to feel strict; you can present them as part of becoming “train crew” with special responsibilities.


Step 10: Make the First Run Special

Finally, give this first run the celebration it deserves. A few simple touches can turn it into a memory:

  • Have a countdown before the first lap.
  • Take a photo or short video with the whole family gathered around.
  • Let each child take a turn at the throttle (with an adult nearby).
  • Start a small “railroad log” notebook where you write the date of the first run and maybe even the name of your new railroad.

By the time you pack up for the day, you will have moved from a box of parts to a safely running train—and from curiosity to real enthusiasm. In the next article, the series will explore how to choose a good “home” for your railroad, whether that is a table, a corner of the family room, or a layout that comes out each Christmas and grows a little more every year.

Your Christmas train set is no longer just a holiday novelty; it is the beginning of a hobby that can bring your family together for years to come.

For more train accessories check HERE.

Picking Your First Locomotive: A Family Guide to Smarter Model Railroading Expansion


Introduction

Upgrading your starter train set is a major milestone for every new model railroad family. While your original set likely came with a dependable locomotive, expanding your roster brings diversity, improves play, and sets the stage for more realistic operations as your layout and interest grow. But faced with so many brands and models, how do you choose your first new locomotive? This article will empower parents and kids to select a locomotive that looks great, runs reliably, and fits their goals—so everyone enjoys the next stage of the journey.

Understanding Scales and Compatibility

Before selecting, double-check your train’s scale (HO, N, O, etc.) so the new locomotive matches both your track and existing rolling stock. Mixing scales is a frequent rookie mistake—so read the box or manual if you’re unsure.

Choosing Locomotive Types

  • Steam vs. Diesel: Steam engines have classic, old-time charm, perfect for vintage scenes and younger kids who love “Thomas”-like engines. Diesels and electrics are rugged, easy to run, and suit modern layouts.
  • Passenger vs. Freight: Think about what you want to haul most. Passenger locos pair with elegant coaches for family travel scenes. Freight engines are ideal for operational games—delivering cargo across your budding empire.

Key Features to Consider

  • Ease of Maintenance: Choose models with simple, accessible mechanisms so families can keep them clean and running.
  • Durability: Young children may be hands-on. Opt for sturdy mechanisms and robust body shells, especially for entry-level use.
  • Control System Compatibility: If you plan to switch from DC (traditional) to DCC (digital), look for “DCC-ready” locomotives for easy future upgrades.

Top Picks for Starter Family Locomotives

  • Bachmann, Lionel, and Kato are all beginner-friendly brands with strong reputations for reliability and support.
  • Consider local railroad favorites or engines seen in your area for personal connections and history learning.

For a look at various steam and diesel locomotives check here.

Color, Style, and Storytelling

Involve the whole family in picking a color or type. Vote on favorites or research real-life trains that inspire your adventures—this sparks creative energy and deeper play.

Testing, Running, and Learning

Once purchased, test your new loco at different speeds, on curves, over switches, and hauling cars. Practice running two engines if your system allows, encouraging teamwork and gentle competition.

Wrapping Up

With the right locomotive, your family’s model railroad will gain energy, realism, and fun. Remember, upgrading is about play—enjoy the journey, and grow your skills together