The Ultimate 2025 Guide to Buying a Kid’s First Telescope — From a Mom Who’s Been There

When you’re a single mother shopping on Amazon for your 6–10-year-old’s first telescope or binoculars, the key is to focus on ease of use, safety, and lasting curiosity—something that makes astronomy fun without being frustrating. Here’s a complete list of questions you’ll want to know the answers to before buying, based on leading astronomy guides and family-focused resources. More Information.


1. What do I want my child to see?

Ask yourself what kind of viewing experience your son wants:

  • Moon and planets? Look for a refractor telescope with a smaller aperture (60–80mm) for bright, clear details.
  • Stars, nebulae, or galaxies? Choose a reflector telescope with a larger aperture (90–130mm) that gathers more light.
  • Simple sky watching or birding by day? Start with kid-sized binoculars (7×35 or 8×21)—they’re lightweight and affordable.

Amazon Search Example:
“Best telescope for kids to see the moon clearly”
“Binoculars for child astronomy and nature watching”


2. How easy is it to set up and use?

A telescope that’s too technical can frustrate a beginner.
Look for:

  • Clear instructions, labeled as “easy setup” or “no tools required.”
  • An alt-azimuth mount (simple up-down, left-right control).
  • Adjustable tripod height for both mom and child.

Tip: Avoid complex “GoTo” or computerized scopes until your child has experienced basic astronomy first.More Information.

Search Terms:
“Easy setup telescope for kids 6–10”
“Simple tabletop telescope for beginner family use”


3. Is it durable and stable for children?

Kids are naturally curious and sometimes rough on equipment.
You’ll want to check:

  • Durable housing: metal or rigid plastic.
  • A stable tripod: avoid models with wobbly mounts.
  • Shock-resistant eyepieces: especially for binoculars.

Binoculars Tip: Choose ones with rubberized grips, breakaway straps, and padded eyepieces. These protect both the equipment and your child’s face. More Information.

Search Example:
“Durable first telescope for kids”
“Shockproof binoculars for kids outdoor and astronomy”


4. What size and weight are manageable for a 6–10-year-old?

The best starter scope or binocular feels stable, not heavy.

  • For telescopes, look for under 10 lbs total weight.
  • For binoculars, choose lightweight models (under 1 lb) and magnifications between 2× and 8× so steady viewing is easy.

Example Keywords:
“Lightweight telescope for kids beginner”
“Compact binoculars for children small hands”


5. What is aperture—and why does it matter?

Aperture = the size of the telescope’s main lens or mirror.

  • More aperture = more light and better detail, but also heavier and costlier.
    For kids, 60mm–100mm is ideal—you’ll clearly see the Moon’s surface, Jupiter’s moons, and Saturn’s rings without frustration. More Information.

Ask: “What is the aperture size of this telescope?”

Search Example:
“70mm refractor telescope child beginner”
“100mm tabletop reflector telescope for kids”


6. What magnification is appropriate for a child?

High magnification sounds exciting (“400× power!”), but it’s often poor quality.
Look instead for:

  • Quality optics over power.
  • A starter telescope with 20×–100× magnification range — this gives crisp, steady viewing.
  • For binoculars, start around 7× or 8×.

Ask on Amazon:
“What is the maximum useful magnification for this model?”


7. Should I choose a refractor or reflector telescope?

Reflector

Refractor

Each type suits different goals: More Information.

TypeBest ForProsCons
RefractorMoon, planetsEasy to use, low maintenanceSmaller apertures
ReflectorNebulae, faraway starsGreat light gatheringNeeds alignment (collimation)
Tabletop ReflectorFamilies & kidsEasy to moveLow tripod height
BinocularsMulti-use, day/nightPortable, no setupLower detail level

Starter Telescopes

8. How much supervision and maintenance does it need?

Ask yourself realistically:
“Can I help assemble or supervise its use outside at night?”

  • Refractor telescopes are lower maintenance — sealed and simple.
  • Reflectors require occasional cleaning and optical alignment.
  • Binoculars need virtually no maintenance.

Best Low-Maintenance Models:
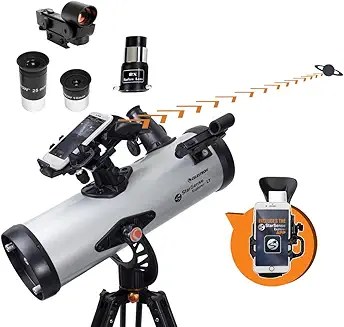
The Celestron AstroMaster 70AZ and Orion SkyScanner 100mm are top family picks for ease of use. More Information.


9. What kind of accessories do we need?

Starter telescopes should include:

  • Multiple eyepieces (low and high power)
  • A finder scope or red dot sight
  • Free software or a stargazing app
  • Optional smartphone mount for taking photos

Search Example:
“Kids telescope kit with app and phone adapter”
“Beginner telescope with tripod and dual eyepieces”

Tip: Don’t forget a simple astronomy beginners’ book—kids love matching constellations while observing. More Information.


10. Where will we use it most—indoors, backyard, or camping trips?

This helps decide between tripod telescopes (home use) and portable tabletop or handheld binoculars.

Ask:

  • “Does this telescope fit in my car/trunk?”
  • “Can it be used without plugging in?” (for electric sets)
  • “Does it include a carry bag or case?”

Search Phrases:
“Portable telescope for kids and families”
“Compact travel binoculars for children”


11. What is a realistic budget for a beginner astronomy setup?

TypeBudget RangeModel ClarityExample
Kid-friendly Binoculars$25–$60Great for stargazing & natureNikon Prostaff P3 8×42 More Information
Basic Telescope$70–$150Good for Moon & planetsCelestron FirstScope or AstroMaster 70AZ More Information
Advanced Starter$150–$250Planets & brighter galaxiesOrion SkyScanner or Meade Infinity More Information

Rule of thumb: Start affordable, see if your son loves stargazing, and upgrade gradually.

Telescopes


12. Are there learning resources or apps included?

Engaging materials can help keep your son curious beyond the first few nights.
Look for telescopes like Celestron Inspire 100AZ that include smartphone adapters or apps with guided tours of the sky. More Information.

Ask:

  • “Does this telescope include an app or guidebook?”
  • “Can we take photos with our phone?”

Search Examples:
“Telescope with smartphone adapter for kids”
“Starter astronomy kit for families”


Final Tip for Parents:

If your goal is to spark wonder (not confusion), choose simple, durable, and fun equipment that works right out of the box.
Pair observation nights with stories about planets and constellations—your child’s excitement will grow astronomically!

Quick Parent-Oriented Searches:

  • “Best beginner telescope for 7-year-old with help from mom”
  • “Educational astronomy kit for kids and parents”
  • “Family stargazing telescope easy to set up 2025”

Would you like a Pinterest Pin set (titles, descriptions, and keywords) designed for this article, geared toward fall and holiday search trends (“STEM gifts,” “family astronomy nights,” “early Christmas science toys”)? It would boost your reach for the 2025 season.

  1. https://www.astronomy.com/astronomy-for-beginners/the-best-telescopes-for-kids-picked-by-experts/
  2. https://www.livescience.com/best-binoculars-for-kids.html
  3. https://www.space.com/29798-best-telescopes-for-kids.html
  4. https://www.astroshop.eu/magazine/buying-guide/the-ultimate-buying-guide-telescopes-for-children-and-teenagers/i,1577
  5. https://www.reddit.com/r/telescopes/comments/16btts7/whats_a_good_starter_telescope_for_a_10_year_old/
  6. https://www.reddit.com/r/telescopes/comments/z9s352/beginners_quick_guide_to_choosing_your_first/
  7. https://www.reddit.com/r/telescopes/comments/168sjsq/help_for_daughters_first_telescope_what_to_buy/
  8. https://www.cloudynights.com/topic/902332-telescope-for-beginner-kids-10-12/
  9. https://www.facebook.com/groups/manastrosoc/posts/10169431340430612/
  10. https://www.livescience.com/technology/best-telescopes-for-kids

5 Top Model Train Accessories for 2025: A Family-Friendly Guide for Beginners

Model railroading is an exciting and rewarding hobby, and the accessories you choose can make all the difference in bringing your layout to life. As technology advances, new tools and features emerge every year, enhancing both realism and functionality. In 2025, several innovative accessories have become must-haves for hobbyists looking to elevate their layouts. This family-friendly article explores the top five model train accessories for 2025, perfect for beginners and families alike.


1. Digital Command Control (DCC) Systems

What It Is:

Digital Command Control (DCC) systems allow you to operate multiple trains independently on the same track. In 2025, DCC systems have become more user-friendly, with wireless connectivity and app-based controls.

Why It’s a Must-Have:

  • Ease of Use: Modern DCC systems feature intuitive interfaces that make it easy for beginners to learn.
  • Enhanced Control: You can control speed, direction, lighting, and sound effects for each train individually.
  • Family Fun: App-based controls allow multiple users to operate trains simultaneously, making it a great activity for families.

Tips for Beginners:

  • Start with entry-level DCC systems like the NCE Power Cab or Digitrax Zephyr Express.
  • Use online tutorials and videos to learn how to program locomotives.

2. LED Lighting Kits

What It Is:

LED lighting kits are used to illuminate buildings, streetlights, and train interiors on your layout. In 2025, smart LED kits with programmable features have become increasingly popular.

Why It’s a Must-Have:

  • Realism: Lighting adds depth and atmosphere to your layout, especially during nighttime scenes.
  • Energy Efficiency: LEDs consume less power and last longer than traditional bulbs.
  • Customizable: Programmable kits allow you to adjust brightness and color for different scenes.

Tips for Beginners:

  • Use warm white LEDs for indoor lighting and cool white LEDs for outdoor areas.
  • Experiment with dimming effects to create realistic shadows.

3. Sound Modules

What It Is:

Sound modules provide realistic audio effects like train whistles, engine noises, station announcements, and ambient sounds. In 2025, sound modules have become more compact and versatile.

Why It’s a Must-Have:

  • Immersion: Sound effects bring your layout to life by adding an auditory dimension.
  • Customizable: Many sound modules allow you to upload custom audio files.
  • Family-Friendly: Kids love hearing realistic train sounds as they operate the layout.

Tips for Beginners:

  • Start with pre-programmed sound modules like those from SoundTraxx or MRC.
  • Place speakers strategically around your layout for even sound distribution.

4. Static Grass Applicators

What It Is:

Static grass applicators are tools used to create realistic grassy textures on your layout. In 2025, rechargeable applicators with adjustable voltage settings are trending.

Why It’s a Must-Have:

  • Realism: Static grass stands upright when applied correctly, mimicking real grass.
  • Versatility: Applicators can be used for fields, lawns, or overgrown areas.
  • Easy to Use: Modern applicators are lightweight and beginner-friendly.

Tips for Beginners:

  • Practice on a small area before applying static grass to larger sections of your layout.
  • Mix different shades of grass fibers for a more natural look.

5. Modular Scenery Kits

What It Is:

Modular scenery kits include pre-made components like hills, tunnels, rivers, and bridges that can be easily assembled and customized. These kits have become more detailed and lightweight in 2025.

Why It’s a Must-Have:

  • Time-Saving: Modular kits simplify the process of building complex terrain features.
  • Customizable: You can paint and add details to match your layout’s theme.
  • Family-Friendly: Assembly is straightforward and fun for all ages.

Tips for Beginners:

  • Choose kits that match the scale of your layout (e.g., HO or N scale).
  • Combine modular components with natural materials like rocks or twigs for added realism.

How These Accessories Enhance Your Layout

These top accessories not only improve the visual appeal of your model railroad but also make it more interactive and engaging. Here’s how they contribute:

  1. Realism: DCC systems and sound modules create lifelike operations that mimic real-world railroads. LED lighting adds atmosphere while static grass enhances scenery detail.
  2. Functionality: Modular kits save time while allowing you to focus on creative aspects of your layout.
  3. Family Fun: All five accessories offer opportunities for collaboration—whether it’s programming trains or assembling scenery components together as a family.

Beginner Tips for Accessory Integration

If you’re new to model railroading, here are some tips to help you incorporate these accessories into your layout:

  1. Start Small: Focus on one accessory at a time to avoid feeling overwhelmed.
  2. Learn as You Go: Watch tutorials online or join local model railroading clubs for guidance.
  3. Experiment: Don’t be afraid to try different techniques or configurations until you find what works best.
  4. Involve the Family: Assign tasks like painting scenery or programming trains to make it a shared activity.

Final Thoughts

The world of model railroading continues to evolve with new technologies and innovations each year. In 2025, accessories like DCC systems, LED lighting kits, sound modules, static grass applicators, and modular scenery kits are helping hobbyists create layouts that are more realistic and engaging than ever before.

For beginners, these tools provide an excellent starting point while offering plenty of room for creativity and customization. Whether you’re building a bustling cityscape or a quiet countryside scene, these accessories will help bring your miniature world to life—and create wonderful memories along the way!

So gather your family, pick up these must-have items, and start crafting a model railroad layout that’s truly breathtaking!


References

  1. Kalmbach Media (2025). Model Railroader Magazine. Various issues featuring reviews of model train accessories.[^1]
    Website: https://www.trains.com/mrr
  2. Woodland Scenics (n.d.). Scenery Techniques.
    Website: https://woodlandscenics.com
  3. National Model Railroad Association (NMRA). Recommended Tools & Accessories.
    Website: https://nmra.org
  4. Digitrax (2025). DCC Systems Overview.
    Website: https://www.digitrax.com
  5. Luke Towan (2025). YouTube Channel. Tutorials on integrating advanced techniques into model railroads.[^2]
    Link: https://www.youtube.com/@LukeTowan

[^1]: Kalmbach Media provides insights into modern tools like DCC systems that enhance model railroading layouts.
[^2]: Luke Towan’s tutorials offer step-by-step guidance on using accessories like LED lighting kits effectively.


Exploring the December Night Sky: A Celestial Celebration for Families

As December unfolds, the night sky becomes a canvas of celestial wonders, inviting families to embark on a cosmic adventure. From dazzling constellations to bright planets and a meteor shower, the December night sky offers a celestial celebration for stargazers of all ages. In this family-friendly guide, we’ll delve into the splendors awaiting you and your loved ones as you gaze upwards during this magical time of the year.

Chapter 1: The Winter Constellations

December marks the official arrival of winter in the Northern Hemisphere, bringing with it a host of iconic winter constellations. These stellar patterns, rich in mythology and beauty, add a touch of enchantment to the crisp winter nights.

1. Orion, the Hunter: One of the most recognizable and prominent winter constellations is Orion, the Hunter. Known for its distinctive “belt” of three bright stars, Orion dominates the southwestern sky during December evenings. For families, spotting Orion is like finding an old friend in the night sky.

2. Taurus, the Bull: The constellation Taurus, with its prominent orange star Aldebaran and the stunning Pleiades star cluster, graces the eastern sky. These celestial gems are a delight to observe, especially for children fascinated by the stories of ancient mythology.

3. Canis Major and Canis Minor: Keep an eye out for the bright star Sirius in Canis Major, often referred to as the “Dog Star.” Sirius is the brightest star in our night sky and adds a brilliant twinkle to winter evenings. Canis Minor, a smaller constellation, features the star Procyon, another gem in December’s celestial display.

Chapter 2: The Geminid Meteor Shower: Nature’s Fireworks

December offers stargazers one of the most spectacular meteor showers of the year—the Geminids. Known for their bright and colorful meteors, the Geminids provide a celestial fireworks display that is perfect for families to enjoy.

The Geminid Meteor Shower: Peaking around mid-December, the Geminids are associated with the asteroid 3200 Phaethon. This shower is unique because it produces a high number of meteors, some of which can be quite bright and leave persistent trails. Find a dark location away from city lights, bundle up in warm clothes, and witness nature’s own light show.

Chapter 3: The Great Conjunction of Jupiter and Saturn

A celestial event of special significance occurs in December—the Great Conjunction of Jupiter and Saturn. These gas giants come together in the night sky, creating a mesmerizing celestial alignment that hasn’t been this close in centuries.

The Great Conjunction: Jupiter and Saturn appear in the southwestern sky after sunset, gradually drawing closer throughout December. On December 21, they reach their closest point, creating a stunning double planet effect. Even a small telescope will reveal the distinct rings of Saturn and the cloud bands of Jupiter.

For families, witnessing this rare event can be a memorable experience. Encourage your children to observe the changing positions of Jupiter’s moons and Saturn’s rings over the course of several nights. This celestial dance is a testament to the dynamic nature of our solar system.

Chapter 4: The Moon’s Phases and Observations

The Moon, our constant celestial companion, graces the December night sky with its changing phases. Observing the Moon’s craters, mountains, and lunar seas can be an engaging activity for families.

Moon Phases in December:

  • New Moon (December 4): The Moon is not visible, presenting an excellent opportunity for stargazers to observe faint celestial objects.
  • First Quarter (December 11): Half of the Moon is illuminated, revealing striking shadows along the lunar terminator.
  • Full Moon (December 19): The entire face of the Moon is lit, casting a silvery glow. Use binoculars or a telescope to explore lunar features in detail.
  • Last Quarter (December 27): Half of the Moon is again illuminated, but on the opposite side from the First Quarter phase.

Lunar Observations: Challenge your family to observe the Moon’s changing phases throughout December. Discuss the reasons behind these phases and explore the lunar features visible through binoculars or a telescope. Identify prominent craters like Tycho and Copernicus, enhancing your family’s lunar exploration.

SHOP NOW for Star Gazing supplies

Chapter 5: Stargazing Tips for Families

To make the most of your December stargazing experiences, consider these practical tips for families:

  1. Dress Warmly: December nights can be chilly, so dress in layers to stay warm. Blankets, gloves, and hats can make your stargazing sessions more comfortable.
  2. Use Stellar Apps: Take advantage of stargazing apps that help identify constellations, stars, and planets. Some apps even include augmented reality features, allowing you to point your device at the sky and see information about celestial objects.
  3. Telescope and Binoculars: While not mandatory, a small telescope or binoculars can enhance your stargazing experience. They allow for closer views of the Moon, planets, and even deep-sky objects.
  4. Create Sky Stories: Weave your own stories about the constellations. Encourage your children to imagine shapes and characters in the stars, fostering creativity and a sense of wonder.
  5. Celestial Calendar: Plan your stargazing sessions around celestial events like meteor showers, planetary conjunctions, and Moon phases. Mark these dates on a calendar, making astronomy an integral part of your family’s monthly activities.

Chapter 6: The Cosmic Connection in December

Beyond the scientific and observational aspects, stargazing in December provides families with a unique opportunity to connect with the cosmos on a deeper level:

  • Cultural Exploration: Explore the cultural significance of celestial objects. Share myths and stories associated with constellations from different cultures, fostering a sense of connection to human history.
  • Family Traditions: Establish stargazing traditions within your family. Whether it’s setting up a telescope in the backyard, creating celestial-themed art projects, or sharing hot cocoa under the stars, these traditions create lasting memories.
  • Wonder and Awe: Embrace the sense of wonder and awe that the night sky evokes. Instill in your children a curiosity about the universe, igniting a lifelong passion for exploration and discovery.
  • Reflection and Contemplation: Use the quiet moments under the stars for reflection and contemplation. Discuss the vastness of the cosmos and our place within it, fostering a sense of humility and interconnectedness.

SHOP HERE for Star Gazing Equipment

Conclusion: A Celestial Journey for the Whole Family

In conclusion, the December night sky unfolds as a celestial celebration, inviting families to partake in the wonders of the cosmos. Whether you’re observing the Geminid meteor shower, marveling at the Great Conjunction, or simply exploring the beauty of the Moon, the December sky offers a rich tapestry for families to explore together. So, bundle up, gather your loved ones, and let the December night sky be the backdrop for a celestial journey that will leave lasting impressions and spark a lifelong love for the wonders of the universe. Happy stargazing!

**

Fifteen Tips For Better Photography

Keep an eye on the weather
Weather conditions can play a big part in setting the mood of your shot. Rather than waiting for the bright light of the midday sun, a misty morning in a forest can be the perfect time of day for that mood-shot.

Take your time to choose the subject
Take your time to choose the subject, then spend time walking around the subject looking for the best angle and lighting.

Take your time to set up the shot
Don’t be afraid to take your time to set up your shot. Although it can get a bit frustrating if you have your loved ones tagging along and they’re sitting and waiting impatiently for 20 minutes for you to take a single shot of a piece of driftwood on the beach!

Don’t always choose brightly-colored subjects
Subjects with muted colors can sometimes produce excellent results. A field of wheat of similar yellow-brown colour can produce striking results when accompanied by a low-sun and long shadows.

Movement diffusion
If you have a camera that allows you to shoot with a manual shutter speed – try slowing the speed and increasing the F-stop. Then move your camera when taking the shot. Some very effective arty-type images can be produced with blur effects.

Movement diffusion
If you have a camera that allows you to shoot with a manual shutter speed – try slowing the speed and increasing the F-stop. Then move your camera when taking the shot. Some very effective arty-type images can be produced with blur effects.

Don’t always choose brightly-colored subjects
Subjects with muted colors can sometimes produce excellent results. A field of wheat of similar yellow-brown color can produce striking results when accompanied by a low-sun and long shadows.

Movement diffusion
If you have a camera that allows you to shoot with a manual shutter speed – try slowing the speed and increasing the F-stop. Then move your camera when taking the shot. Some very effective arty-type images can be produced with blur effects.

Movement diffusion
If you have a camera that allows you to shoot with a manual shutter speed – try slowing the speed and increasing the F-stop. Then move your camera when taking the shot. Some very effective arty-type images can be produced with blur effects.

Overexpose your subject
Not too good to do all the time, but experiment with results by over-exposing the subject.

Try macro photography
Grab a magnifying glass and see if you can focus your camera through the glass onto a small subject. It just may work! And may open up a whole new range of subjects for you!

Shoot through wet glass
Try spraying water onto a window, then take a shot through the window to a subject outside. (wet the outside of the window – not the inside of your home!)

Color balance
Try balancing color by having subject and the surrounding detail in similar colors.

Silhouettes
Silhouettes usually have a small range of colors, but can produce some of the most beautiful images. Shooting a silhouette involves having the background brighter then the subject in the foreground.

Experiment with patterns
We’ve all seen those amazing images of the red and orange leaves of maple trees in the fall/autumn. Thousands of leaves – all of a similar shape and color – but very awe-inspiring and beautiful.

Compliment colors
Two strikingly-different colors can be beautiful too. Picture an image of your girlfriend or wife in a red dress sitting on a field of green grass. Or your boyfriend or husband in a red shirt walking through a field of waist-high wheat stalks. Complimentary colors that will bring more attention to the subject.

Use a color filter
If your camera can be fitted with colored filters – try your hand. Although this effect can be made quite easily these days with photo and image-editing software.

Sunrise is better than sunset
Wake up before sunrise one day and go on a photography expedition. If you’ve not done it before you’ll be pleasantly-surprised by the contrasting light and shadows. But remember you’ll only have a very short window of time in which to shoot (usually less than an hour) before the sun rises too high and you lose the light.

Use a flash in daylight
Use your flash during the daytime to fill a close subject with light. This will produce better results where the background is brighter than your subject and the automatic shutter speed on your camera shoots too fast to effectively show the detail of your subject.

Filters For Landscape Photography

Filters are used in photography to bring back an image to the way our eyes have perceived the original scene. Some times its not possible for our cameras to record an exact scene – so we have to rely on the manufacturers of camera products.

Filters also help us to create mood in our images and bring out the best in a scene. A small selection of filters is well worth packing when heading off for a trip. They don’t take up too much space and will definitely add a bit of spice to your images.

Filters work by being placed in front of your camera lens. You can also place several filters in front of your camera at any given time.

Lets take a look at the most important ones to use

Mastering Filters for Photography

Neutral Density Filters (ND): Neutral Density filters will certainly help you with tough exposures. These filters work by cutting down the light that reaches your lens. These filters come in a variety of strengths with the most popular being 0.3, 0.6 and 0.9 – these filters will help with exposure without affecting color.

One half of these filters is dark and the other is completely clear. They basically work by reducing brightness. The different numbers stand for the amount of brightness they reduce – 0.3 ND reduces light by one stop – 0.6 reduces light by 2 stops – 0.9 reduces light by three stops.

Lets say you arrive at a high contrast scene, – you take a light reading of the sky and get an exposure reading of F/22 at 1/8 second; you take a reading from the ground in front of you and get a reading of F/22 at 1 second. This is a difference of three stops of light. You need to reduce the brightness of the sky. By using the 0.9 ND you will reduce the light in the sky by three stops without affecting the light hitting the ground in front of you.

Polarizing Filters: A polarizing filter should be top of the list – a polarizing filter can be used with color or black and white and is probably the most important filter on the market today. The polarizing filter will also darken the blue sky to give it a strong rich color. It will make mist stand out and can be also used to give fast flowing water a misty effect. This filter is most effective with side lighting.

Warm-up filters: In overcast conditions, don’t put your camera away. This is an ideal time for you to switch your attention to landscape detail. On an overcast day images often appear cold and dull. Try using a warm-up filter. These filters will remove the dull effect that you get shooting without the sun.

The 81-series are the best choice and will give your images an extra bit of life. An 81A warm-up filter is ideal to use in adding extra warmth to low light images.

Filters for B/W photography: Just because you use black and white film it doesn’t mean that you cant use filters – there are several filters for B/W photography. The polarizing filter is one of the few filters that work for B/W and color photography. It will help to darken shades of grey in your final print.

The red filter is one of the most popular. This filter will darken the sky giving your image more impact. The most common red filter is the number 25. Filters for B/W work by transmitting light of its own color, and holds back light of the other colors.

There’s a large amount of filters available; these are the most important filters for landscape photography.
There are also several filters on the market today that will do very little for your photography. Color graduated filters should be left at home or placed in the bin – color graduated filters work by creating un-natural colors, destroying your final print.

Improving Your Landscape Images Part 2

We use filters in photography to bring back an image to the way our eyes have perceived the original scene. Some times its not possible for our cameras to record an exact scene – so we have to rely on the manufacturers of camera products.

If you are only going to buy one filter for your landscape photography a polarizing filter is the one youll use most. A polarizing filter can be used with color or black and white and is probably the most important filter on the market today.

Lets take a quick look at the science behind it. A polarizing filter is made up of two pieces of glass which when rotated cut out all glare on non-metallic surfaces. Light travels in waves – these waves travel in all directions and at different rates and speeds. The polarizing filter works by limiting the amount of waves that enter your lens. You decide how many waves pass through your lens by rotating the filter.

The polarizing filter is most effective with side lighting.

For example: if you are taking a picture of a scenic lake area and there is a messy reflection of the clouds in the lake; it will be too much of a distraction in the final picture. This can be simply removed by rotating the polarizing filter until the clouds disappear. You can view the filter working in the viewfinder of your camera.

The polarizing filter will also darken the blue sky to give it a strong rich color. It will make mist stand out and can be also used to give fast flowing water a misty effect.

You don’t have to rotate the filter the full amount to get the maximum affect you need, sometimes you will only have to rotate it a small amount. You can decide best for yourself by viewing through your viewfinder while you rotate the polarizing filter.

This filter is not just for a landscape photographer.

There are many different uses for a polarizing filter, which make it so important for all photographers. Property photographers would find this filter extremely handy – when taking an image of a shop front, the polarizing filter will remove glare that reflects off the glass.

Take extreme care when calculating exposure. Remember that you will have to add two stops of light when using the polarizing.

Related posts

Photography as a Hobby

Learning Photography – Basics For All

Some Important Principles Of Photography

Digital Photography Lessons

PHOTOGRAPHY 101

Finding The Right Photography Book

How To Choose Digital Photography Books

Beginning In Photography: Exposure Basics

Beginning In Photography: Composition

Beginning In Photography: Choosing A Camera

Beginning In Photography: Choosing The Right Lens

Using Filters in Photography

Filters for Landscape Photography

Beginning In Photography: Choosing The Right Lens

There is a dizzying array of choices when it comes to choosing lenses for DSLR cameras. From wide angle to telephoto, zoom to prime lenses, fish eye, fast lenses, wide aperture lenses, the choice seems to be impossible. Its not really. What it comes down to is asking yourself a simple question: What do I want to shoot?

Different Lenses for Different Subjects

If you are just beginning in photography, chances are you are still experimenting and finding out what you like to shoot. You might shoot a few family portraits one day and landscapes from your vacation the next. On the other hand, you may have decided right from the start that you love taking photos of wild animals and this is all you want to do. Either way, the lenses required to get the best out of these subjects differ greatly. To fit an expansive landscape image into your viewfinder, you would need a wide angle lens. However, trying to take a portrait with the same lens would result in a tiny little person and not much else in the frame unless you are right in that persons face and smelling their breath. While trying to take a picture of a wild bear from 100 or more meters away is just impossible (and you really don’t want to get any closer to a wild bear). In a perfect world you would have 3 different lenses for each of these subjects. But in a perfect world you’d also be a millionaire and be able to afford them all. So the thing to do is to decide what type of photography interests you and choose your lenses accordingly.

Length: Zoom versus Prime

There are benefits to using both zoom lenses and prime (fixed or non zoom) lenses. On one hand, zoom lenses are versatile, and reduce the need for a whole bag full of lenses that you need to change and change again while you are out shooting. On the other hand, a good quality prime lens can be gold. Prime lenses, if they are well built, generally produce a crisper, better quality image. This is because they have fewer pieces of glass and moveable parts. Therefore the light coming in doesnt need to pass through as many objects and so is less diffused. The other great advantage of prime lenses is that because of this, they tend to be faster than zoom lenses. Practically, this means that you can use slower shutter speeds as the lens needs less light to create a correct exposure. This is especially useful if you want to take portraits with available light.

Aperture

Another important factor to consider when choosing your lens is its maximum aperture. This is indicated in the description by an f symbol. Eg. f/2.8. The lower this number, the wider your aperture choices. For example, if you want to take a portrait with only your subjects facial features in focus, you would use a wide aperture. If you want to take a sweeping landscape where everything needs to be in focus you would use a narrow (high number) aperture. Selecting a lens with a wider aperture gives you more options when out shooting.

It is well known that lenses can cost as much, or more, than cameras themselves. It is also worth noting that with lenses you get what you pay for. While no piece of equipment can singularly make the difference between a good photo and a bad one, a well built lens using quality glass, can lead to sharper pictures. Therefore it is worth considering the lenses you buy carefully and investing in the best quality you can afford. Knowing what sort of photography you want to pursue can make this process a whole lot less daunting and more cost effective.

Beginning In Photography: Choosing A Camera

Youve been snapping away with your nifty little point and shoot camera for a while now and you’ve discovered you really like taking pictures and want to get more creative and have more control over your photos. Naturally the next step is to upgrade to an DSLR camera. But which one? There is a ridiculous number of products out there with all sorts of buttons and dials that do this or that. This article attempts to give a brief overview of the things that are actually important when considering which camera to buy.

Firstly, lets dispel one of the most common myths associated with upgrading equipment. Buying a new camera will not make you a better photographer. Repeat: it will NOT make you a better photographer. Not instantly, not in 2 years time, not in 10 years. What will make you a better photographer is you. Your willingness to learn and develop your skills. Sure a high end camera will give you more control over your image making, but thats just it; its you controlling the camera, and therefore the end image. Ok, now that were on the same track, a few things to think about.

How many megapixels do I need?

We are going to assume that you are looking at digital cameras here, although I should point out that there are some excellent film cameras around at much less expense. So dont discount film altogether (its not dead just yet!). But to answer the question, we first need to answer another: What do you want to do with your photos? If you only want to post your photos on the web, e-mail them or make small prints to put in a photo album, the resolution you need for this is quite low. To give you an idea, a camera with 2 megapixels will create an image that can make a good quality 6 x 4 print (standard photo album size). Most entry level DSLR cameras start at around 6 megapixels. Therefore if this is all you want to do with your images, the amount of megapixels does not need to be a major concern. If, however, you want to make large sized prints, you may need a higher resolution camera. While entry level DSLRs often produce very good quality prints up to a certain size, more pixels gives you the freedom of being able to enlarge even further. While image software programs can increase the size of your photos they will lose some quality. Starting with a larger image means that fewer pixels are added by the program and less quality is lost.

Is brand important?

Not as important as some would have you think. While photographers will continue to debate the Nikon vs Canon issue, my belief is that it is a moot point. Both companies produce some excellent products and some pretty ordinary ones. What should be foremost in your mind is build quality. How many plastic parts does the camera have versus metal ones? Metal parts can be replaced, while plastic parts are usually set into a mold and cannot be. Potentially this could mean the difference between having to buy a new part or a new camera a few years down the track. Check how the camera feels in your hand. If it feels solid and sturdy, it probably is. Quality between brands doesn’t differ greatly until you get into the higher end cameras. This is where Nikon and Canon come to the fore and other brands that don’t target this market drop off. However if you decide you don’t need a higher end camera, don’t discount other brands.

What about features?

Cameras come with all sorts of different modes and features. Some of them seem to be included for no other reason than to be a selling point for that particular model. It takes a little research to discern which are actually going to be useful. There are, however, some that you should factor into your considerations. Firstly, what mode settings does the camera have? Many entry level DSLRs have similar settings to point and shoot cameras. I.e. Portrait, landscape, low light etc. While these make things easy, the point of moving up to an DSLR camera is to gain more control over your photos. You will never gain the control you want without learning how to use a camera in full manual mode.
Other features, such as a built if flash or cable release socket, may be important to you depending on the type of photography you want to do. If you like to shoot portraits, a built in flash can be a huge help in lighting shadows. If you are interested in landscape photography, you will at some point want to set you camera up on a tripod to capture a low light scene. Using a cable release allows you to press the shutter without actually touching the camera, removing the camera shake that blurs a picture.

One final consideration.

This is possibly the most important of all. Make sure the camera you choose is comfortable and easy to use. Check that you can reach all the buttons easily while shooting and that the dial and menu configurations are logical. This allows you to learn your gear easily so that you can concentrate on the most important thing: taking pictures.

Beginning In Photography: Composition

It is one of the most essential elements to taking pictures. It can either make or break a photo. Entire books could be, and have been, written on the subject. As an introduction to composition, this article aims to give an overview of the main points on how to compose photos and improve your photography.

What is your subject?
The most important part of composition is having a clearly defined subject. Decide what the photo is about and hone in on that. It may be a single person in a crowd, or an abandoned house sitting in a rustic landscape. Whatever you decide to make the subject of your photo, decide how to emphasize it and go from there. Choose whether to include other elements in an image based on weather they say something about your subject or not. For example, you may wish to include that huge tree standing near your abandoned house to give scale to the image. On the other hand, you might decide to leave it out if you want the house to appear larger. What you leave out of an image is as important as what you include.

Rule of Thirds
Firstly, what is it? Using the rule of thirds means to divide the scene into thirds horizontally and vertically, so you have an imaginary 9 square grid, and place your subject along one of these lines. Generally this produces a composition that is more pleasing to the eye. Some photographers stick religiously to this rule and others intentionally break it every time they take a photo. Me? Im somewhere in the middle. I believe that there are times when the rule works best and other times when it leaves the image looking a little bland. So my advice on this is learn the rule and practice with it, but also practice breaking it.

Get creative
Being a travel photographer, I often end up in places that have been photographed before. In fact, in this age of high volume digital photography, it is nearly impossible to find a subject that hasnt been covered comprehensively. This presents a challenge: to come up with a new take on an old subject. To make your images stand out you need to do something different. Often this means looking for different angles. Something new and fresh. This might mean getting down on the ground for a low viewpoint, or tilting your camera on an angle to create a new perspective. Whatever your tactics, always strive to do something that hasnt been done. One of my favorite methods is to look at pictures others have taken of your subject before you shoot and think what the opposite viewpoint would be.

Composition can be a simple task. But is essential to understand what makes a good composition rise above a bad one. Like with everything else, the more you practice the easier it will come to you. Eventually it will become so ingrained that you will do it without realizing you are doing it. It is simply a matter of experimenting and finding what works for you.

Beginning In Photography: Exposure Basics

So you’ve just bought a shiny new DSLR camera huh? And a lens or two to go with it? That’s great. Now all you have to do is learn how to use it. I’m assuming here you bought an DSLR camera because you want to do a little bit more than take happy snaps at family events and holidays. So for those new to photography as anything more than that, this article aims to give you a little background on the basics of exposure to help you on your way.

Shutter speed

There are two elements to creating a correct exposure. These are aperture, and shutter speed, which we will look at first. When you press the trigger button on your camera to take a picture, it opens a set of sliders, like opening a window. How long it stays open, depends on how you set the shutter speed. Shutter speeds can range from extremely fast (ie 1/8000 of a second), to very slow (30 seconds), or even infinity if your camera has a bulb setting. These are extreme shutter speeds and not often used, except by people who shoot fast moving subjects, or in very low light. For most of us, we tend to stick to somewhere in the middle. As a general rule, the faster the shutter speed, the sharper your photo will be. For most people, anything at 1/60 of a second or above is acceptable when hand holding a camera. Lower if you have a particularly steady hand. If you need to use slower shutter speeds, you will need to use a tripod or rest your camera on a steady surface. These slow speeds can be particularly useful for creating blurred effects. For example the flowing water in a waterfall.

Aperture

Ever wondered how photographers get their subjects to really stand out by blurring the background? The secret (which really is no secret) is adjusting the aperture. The aperture changes the depth of field in your photo. Depth of field is how much of the image is in focus. For example, if you have a depth of field of 4 meters, anything within that distance of the subject you are focusing on will also be in focus. There is as much variety with this control as there is with shutter speed. You can choose to set a narrow aperture (long depth of field) when you want the whole shot in focus, for instance a great, sweeping landscape, or a wider aperture for portraits.

Ok, so youve got your shutter speed sorted from your aperture. Now we just have to put them together. Any SLR camera will have an inbuilt light meter. This little gadget measures the amount of light you will need to create a correct exposure. It is usually in the form of a little bar with a too high (+) and a too low () sign at each end. It is simply a matter of balancing one against the other so that the meter is centered. Once youve done that you can press the button! Thats all there is to it.

ISO

Another choice that will effect your exposure is the ISO you use. With film cameras, this means the speed of film that you use. If you use a 100 speed film, your ISO is 100. Digital cameras also have an adjustable ISO speed. Its just in the form of turning a dial instead of loading a different film. A general rule is to use the lowest ISO you can get away with. Higher ISO films or digital settings can result in noisy (grainy) pictures. They do, however, allow you more freedom in your exposures in that you can shoot with less available light. Experiment with your particular camera, see what you can get away with. Remember that the quality required will be different for everyone. If you only want to make small prints to put in an album, or just store the photos digitally on your computer, then you will not need the same quality as if you want to make large prints to hang on your wall.

So there is some food for thought for those starting out in photography and looking to do more than just point and shoot. Now its time to go out there and shoot. Experiment with different settings. Try new things. The technical side of photography you can read about anywhere. The creative side, well, thats up to you.

Some Important Principles Of Photography

A camera is actually a sensitive machine, which will follow your command and you will be able to take the picture exactly the way you want it. Of course, there are quite a few things that you need to keep in mind before you push the camera button. Here is an insight into certain elements that needs to be taken into account when you are going for that classic picture!

Creativity using camera controls
Mastery over camera controls is necessary. You just cannot do without that. You need to first read the guidebook that most camera manufacturing companies provide with the camera. You need to know the various modes your camera offers from macro to panoramic, back lighting and others.

If you have bought a DSLR then there are several elements that you will have to master and understand to bring out the best composition. A serious digital camera has the ability to provide you with a creative control over the images that you shoot. A digital camera can do this by allowing you the luxury to control both motion and light in all your photographs and at the same time it can demarcate between sharpness and softness. Most of the commonly available consumer digital cameras are completely automatic and hence you will not have to make too many adjustments. But high-end cameras like the DSLR offer the ability to work upon a wider range of controls. So before, you can even think of clicking away to glory; check the automatic exposure as well as the focusing systems, which is a key to achieving a good composition.

The automatic mode
Most of the digital cameras work on an automatic mode. The automatic mode can set the focus as well as the exposure for you and all you have to do is click the subject. The automatic mode will help you in situations where you do not have the luxury of changing lenses or manually focusing especially when you are taking shot of a moving subject. But in spite of the automatic mode, you should choose a sub-mode like the night mode for taking pictures at night, so that according to the sub-mode the camera can adjust itself.

Some key areas
Some of the key areas that most amateurs miss are too basic to be noticed and yet hold a lot of importance. For instance, you should always check in advance if the battery is full or not. You should not be in a situation where you get a great opportunity for a classic composition and the camera battery dies. Check all the minute things and then turn your camera on and set it to the automatic mode. Most digital cameras have an icon that says Auto mode.

Another key area is lighting, which is something that you will need to understand and feel to become a professional photographer. Here are some of the most important lighting conditions that assist photography composition:

Backlighting: This kind of lighting comes from behind the subject. If you are unable to control the requirement of backlighting then it can turn your photography session into a disaster. Most of your pictures will either be over-exposed or burnt. The best way to take pictures with high amount of backlight like the sun behind your subject is by using a fill-flash.

Diffused lighting: As you will learn on the way that sometimes whether the lighting is through an artificial source or a natural source, it can be quite harsh. When the lighting is harsh, you will need to soften it and try to minimize the contrast. Normally, it is advised not to take pictures in such a lighting condition. It is extensively encountered in landscape or nature photography and the best you can do is come back at a different time when the lighting conditions are better.

Framing
This is an important aspect and you need to frame your subject before you can push the camera button to take the picture. The automatic mode gives you a well-prepared platform but if you are unable to frame the primary subject then the final outcome will not be to your liking. Images can become hazy, blur or even distorted. You can frame the subject by using the viewfinder or the LCD monitor. Digital cameras have the zoom view also. So if you need to bring the subject closer then press the optical zoom or digital zoom as necessary. Once all your elements are in place, then go ahead and click the picture.

There will be times when you might not be satisfied with the outcome in spite of having framed the subject and following the guidelines. Do not be disheartened! The best way to move ahead is by experimenting with controls and through improvisations!