Artemis II Countdown: How to Track Friday’s High-Speed Splashdown

1. The “Final Leg” Tracker (Tonight: April 8)

The astronauts (Wiseman, Glover, Koch, and Hansen) are officially back under the influence of Earth’s gravity.

  • The Mission Status: Today, they completed their final exercise routines and began “stowing for entry”—securing all loose gear inside the Orion capsule to prepare for the bumpy ride through the atmosphere.
  • How to Track: Recommend the NASA AROW (Artemis Real-time Orbit Website). It shows the capsule’s exact distance from Earth in real-time. Tonight, they are roughly halfway between the Moon and Earth, traveling at over 2,000 mph.
  • The Visual: Have your readers find the Moon tonight. It’s a Waning Gibbous (about 68% illuminated). Tell them to look at the space just to the “left” (east) of the Moon—that is the path the crew just traveled.

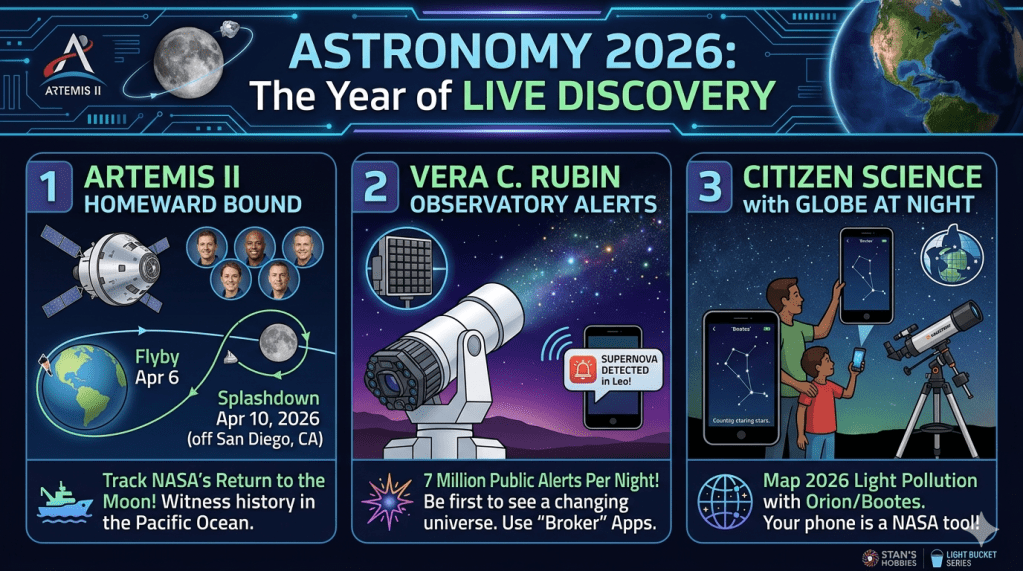
2. Preparing for the “Fireball” Splashdown (Friday, April 10)

The splashdown is scheduled for Friday, April 10, at approximately 8:07 PM EDT (5:07 PM PDT).

  • The Location: The Pacific Ocean, just off the coast of San Diego, California.
  • The Reentry Phase: At 7:53 PM EDT on Friday, Orion will hit the “entry interface.” It will be traveling at 24,840 mph (about 32 times the speed of sound) and will heat up to 5,000°F.
  • The “Blackout”: For about five minutes during reentry, the plasma surrounding the capsule will block all radio signals. This is the most intense “seat-of-the-pants” moment for mission control.

3. The “Light Bucket” Mission for Tonight

Since you are a blogger, give your readers a “Mission Assignment” for tonight to get them ready for Friday’s finale:

  • Target: The Sea of Tranquility on the Moon.
  • The Goal: Photograph the landing site of Apollo 11.
  • The Context: “The Artemis crew just flew over this spot 48 hours ago to scout it for the upcoming Artemis III landing. Look at those craters tonight and realize that for the first time in 50 years, human eyes just looked at them from only 4,600 miles away.”

Summary of Key Dates for Your Post

EventDateTime (EDT)Location/Action
Gear StowageTonight, April 8OngoingCrew securing the cabin for reentry.
Entry InterfaceFriday, April 107:53 PMOrion hits the atmosphere at Mach 32.
SplashdownFriday, April 108:07 PMPacific Ocean near San Diego.
NASA Live CoverageFriday, April 10Starts 6:30 PMWatch live on NASA+ or YouTube.

The “Home Stretch” Alert (Tonight, April 8): The crew has successfully exited the Moon’s gravity and is accelerating toward Earth.

  • Activity: Use the NASA AROW tracker to see the “Earthrise” from the capsule’s perspective.

The “Blackout” Alert (Friday, April 10 – 7:53 PM EDT): This is the most dramatic moment. For several minutes, a layer of ionized air (plasma) will surround the capsule as it hits the atmosphere at 24,840 mph, cutting off all communication with Houston.

The “Parachute” Alert (Friday, April 10 – 8:01 PM EDT): Watch for the deployment of the 11 massive parachutes that will slow the Orion from supersonic speeds to just 17 mph.

The “Splashdown” Alert (Friday, April 10 – 8:06 PM EDT): The final splash in the Pacific near San Diego.

Stan’s “Splashdown” Tip

“For readers on the West Coast, look toward the ocean around sunset on Friday. You might not see the capsule, but the sonic boom and the recovery ships (like the USS John P. Murtha) will be making history right off the shoreline!”

This Artemis II Mission Overview provides a great visual breakdown of the reentry and splashdown process to help you understand the “skip-entry” maneuver Orion will use on Friday.

This video is relevant because it explains the complex physics and timing of the Orion capsule’s return to Earth, which is exactly what your readers will be tracking over the next 48 hours.

Different Types of Model Railroad Track Plans: The 2026 Definitive Guide

Updated from June 2024

Model railroading has undergone a massive transformation over the last few years. While the charm of a steam engine chuffing through a miniature valley remains timeless, the way we plan and build these worlds has entered a new era. Whether you are a “Stan’s Hobbies” regular or a newcomer, choosing a track plan is the most critical decision you’ll make.

A well-thought-out plan prevents “siding blindness” (where you run out of things to do) and ensures your locomotives run smoothly without constant derailments. Let’s dive into the layouts that are defining the hobby in 2026.


1. The Continuous Run (Loop) Layouts

The “loop” remains the king for those who find zen in watching a long freight train roll by. However, in 2026, we’ve moved far beyond the basic “train set oval.”

The “Twisted Dogbone”

This is the evolved version of a loop. By pinching the middle of an oval, you create a narrow section that looks like a double-track mainline. It gives the illusion that the train is going somewhere distant rather than just around in a circle.

The Waterline Loop

A trending 2026 style where the track follows the perimeter of a room but includes a “duck-under” or a swing-gate. This allows for massive radii curves, which is essential if you want to run modern, full-length passenger cars without them looking awkward on tight turns.

Pro Tip: Always use a minimum of 24-inch radius for HO scale if space allows. Your rolling stock will thank you.

🛒 Essential Buy: Top-Rated Nickel Silver Integrated Roadbed Track on Amazon


2. Point-to-Point and Industrial Switching

If you enjoy the “puzzle” aspect of railroading—picking up a boxcar from a factory and delivering it to a yard—point-to-point is for you.

  • Shelf Layouts: These have exploded in popularity as more hobbyists move into urban spaces. A 12-foot long by 18-inch wide shelf can provide hours of entertainment.
  • The Inglenook Sidings: A classic switching puzzle that fits on a 4-foot board. It’s the perfect “desk hobby” for 2026 professionals.

3. Multi-Level and “Mushroom” Empires

For those with dedicated basements or sheds, the 2026 trend is Verticality.

The Helix

A helix is essentially a circular ramp that allows a train to climb from a lower staging yard to a visible upper scenery level. While they take up a 4×4 foot footprint, they double your usable space.

The Mushroom

This design involves two levels of track, but the “top” level is viewed from a raised platform or the other side of the benchwork. It prevents the “stacked” look and allows for much deeper, more immersive scenery.


4. The 2026 Innovation: Modular & Hybrid Plans

The biggest shift we’ve seen since 2024 is the move toward Hybrid Modular Design. Instead of building one giant, heavy table, hobbyists are building 4-foot modules.

  • Why it works: You can finish one “scene” at a time at your workbench and then bolt it into the main layout.
  • T-TRAK and Free-mo: These standards allow you to take your module to a local club and hook it up to 50 other people’s modules to create a layout the size of a gymnasium.

Essential Gear for Modern Planning

You shouldn’t start laying track without these 2026 essentials:

  1. Laser Levels: Forget the old bubble levels. A 360-degree laser level ensures your grades (inclines) are consistent so your trains don’t stall.
  2. DCC Next-Gen Controllers: Modern systems now allow you to control your layout via a smartphone or tablet with full “Sound Value” integration.
  3. Track Cleaning Robots: Yes, they exist! Automated cars that scrub your rails while you run your trains.

🛒 Must-Have: Digital Command Control (DCC) Starter Systems on Amazon


Summary & What’s New in 2026

Since this article was originally drafted in 2024, the model railroading landscape has shifted in three major ways:

  • AI-Driven Design: We now use AI tools to generate “logical” track plans based on real-world topographical maps. You can input your room dimensions, and software will suggest the most efficient use of space.
  • Dead Rail (Battery Power): One of the biggest updates in 2026 is the rise of “Dead Rail.” Many hobbyists are moving away from powered tracks entirely, using high-capacity onboard batteries and Bluetooth control. This means no more cleaning tracks to ensure electrical contact!
  • 3D Printed Infrastructure: Most track plans now incorporate “printable footprints.” You can download a file for a station and know it fits exactly within your siding’s curve before you even buy the plastic.

Whether you’re building a classic 4×8 sheet of plywood layout or a high-tech modular masterpiece, the goal remains the same: Building something with your hands that brings a world to life.

    Complete Beginner’s Guide to Laying Track for an HO Scale Layout

    Building an HO scale model railroad is a fun, creative, and rewarding family project. This guide covers everything a beginner needs to know-from planning and preparing the roadbed to choosing the right track and tools, step-by-step installation, and long-term maintenance. Each section is easy to follow and designed to help you achieve smooth, reliable operation and a realistic look.

    1. Planning Your Layout

    Start by sketching your track plan on paper or using planning software. This helps you visualize your layout and ensures it fits your available space. Mark the centerlines for your track on your baseboard using a pencil for accurate placement later. A well-thought-out plan saves time and prevents mistakes down the line13.

    2. Preparing the Baseboard

    A sturdy, flat base is essential for a reliable layout. Use plywood or foam board supported by a simple wooden framework. Make sure the surface is level and strong enough to support your scenery, track, and trains3.

    Tools you’ll need:

    • Saw (for cutting wood)
    • Drill and screwdriver
    • Measuring tape and ruler
    • Pencil and set square

    3. Understanding HO Scale Track Types

    HO scale (1:87.1) is the most popular choice for model railroaders, offering a balance of detail and manageable size1.

    Code 100 vs. Code 83 Track

    Track TypeDescriptionProsCons
    Code 100Taller rail (0.100″)Durable, easy for beginners, compatible with older trainsLess realistic appearance
    Code 83Lower, more prototypical rail (0.083″)Realistic look, preferred for modern layoutsSlightly more delicate, not always compatible with vintage models
    • Code 100 is robust and forgiving, making it ideal for beginners.
    • Code 83 offers a more realistic look, perfect for those focused on detail.

    Sectional vs. Flex Track

    • Sectional Track: Pre-formed, easy to assemble, ideal for beginners and temporary layouts.
    • Flex Track: Bendable, allows custom curves and more realistic layouts but requires careful cutting and fitting.

    Integrated Roadbed Track

    Some brands offer track with built-in roadbed (e.g., Bachmann EZ Track), simplifying installation for beginners and families.

    4. Choosing and Preparing the Roadbed

    The roadbed raises the track, provides sound dampening, and gives a realistic profile.

    Roadbed TypeProsCons
    FoamLightweight, easy to shape, quiets noiseSlightly more expensive
    CorkTraditional, durable, easy to work withCan dry out or crumble over time
    Integrated TrackSimplifies installation, portableLess realistic, limited flexibility
    • Foam (e.g., Woodland Scenics) is popular for its ease of use and sound dampening.
    • Cork is a classic, affordable choice.
    • Integrated roadbed track is best for quick setups and portability.

    Step-by-Step: Preparing the Roadbed

    1. Mark Your Track Path:
      Use your track plan to draw the centerline on your baseboard.
    2. Cut and Fit the Roadbed:
      For curves, cut slits in the roadbed to help it bend smoothly. Dry-fit the roadbed along the marked centerline.
    3. Secure the Roadbed:
      Apply white glue or double-sided tape to attach the roadbed. Press firmly and use pins or small weights while the glue dries. Ensure it’s level and follows the centerline.
    4. Smooth the Surface:
      Once dry, check for bumps or gaps. Sand any rough edges or uneven spots gently.

    5. Essential Tools for Accurate Track Laying

    • Track alignment gauges (for correct rail spacing)
    • Track cutters (for cutting track sections)
    • Needle-nose pliers (for bending rail ends and inserting joiners)
    • Small hammer or rubber mallet (for gently tapping in track nails or pins)
    • Measuring tape or ruler
    • Pencil/marker
    • Straightedge or flexible curve
    • Small level
    • Adhesive (white glue or double-sided tape)
    • Sandpaper or small file

    6. Laying the Track: Step-by-Step

    1. Position the Track:
      Lay track sections on the prepared roadbed, aligning with the centerline. Shape flex track as needed.
    2. Connect and Secure:
      Join track sections using rail joiners. Use alignment gauges for correct spacing. Secure track with small nails, pins, or a dab of glue (avoid glue near moving parts).
    3. Test and Adjust:
      Run a piece of rolling stock over the track to check for bumps or misalignments. Adjust before final securing.
    4. (Optional) Ballasting:
      Spread model railroad ballast along the track for realism. Mist with a 50/50 water-glue mix (add a drop of dish soap) to secure, avoiding moving parts.

    7. Maintenance and Repair Tips

    • Regular Cleaning:
      Use a soft cloth or track cleaning car to remove dust and dirt. Avoid harsh chemicals.
    • Inspect Joints:
      Check rail joiners and connections for gaps or looseness.
    • Check for Warping:
      Look for any warping or shifting in the roadbed or track, especially after temperature changes.
    • Repair as Needed:
      If a section becomes loose, re-glue or re-nail it. Replace damaged track or roadbed promptly.
    • Wheel and Coupler Checks:
      Make sure rolling stock wheels and couplers are clean and in good condition to prevent derailments.
    • Schedule Maintenance:
      Create a simple checklist to regularly inspect track, roadbed, and rolling stock.

    8. Tips for Success

    • Start simple: Use sectional track and foam or cork roadbed for your first layout.
    • Test as you go to catch and fix issues early.
    • Take your time-patience leads to better results.
    • Involve family members in planning and assembly for a fun, shared project.

    Suggested Images

    • Step-by-step photos: marking the baseboard, fitting roadbed, laying track, testing with rolling stock.
    • Close-ups of track types (Code 100 vs. Code 83).
    • Examples of foam and cork roadbed installation.

    References

    1. Train scale guide – Webflow1
    2. How to Build a Model Railway | Step-by-Step Guide for Beginners & Railfans – YouTube3
    3. Walthers Model Railroading Products5

    With these steps, you’ll be on your way to building a smooth-running, reliable HO scale railroad that the whole family can enjoy!

    For Model Railroad Supplies check amazon.com

    Citations:

    1. https://uploads-ssl.webflow.com/65f0212e0d7ed90e8f284129/681956687209e4ec9278c24d_58250850358.pdf
    2. https://lancemindheim.com/model-railroad-blog/
    3. https://www.youtube.com/watch?v=ZbPkf5B4zXo
    4. https://www.tiktok.com/discover/how-to-put-together-train-tracks
    5. https://www.walthers.com/about-us

    Answer from Perplexity: pplx.ai/share