Backyard Stargazing 101: A Family Guide to the 2026 Spring and Summer Skies

With the warmer air of 2026 finally settling in, it is the perfect season to turn off the patio lights, grab a blanket, and look up. For many of us, the winter months kept our telescopes tucked away in the garage, but spring and summer offer a “re-opening” of the heavens that is uniquely family-friendly. You don’t need a degree in astrophysics or a multi-thousand-dollar observatory to enjoy the show; all you need is a little curiosity and a clear view of the horizon.

This guide is a “refamiliarization” for the seasoned hobbyist and a roadmap for the newcomer. Let’s dive into the basics of exploring the cosmos from your own backyard.


1. Getting Started: The “Three-S” Rule

Before you even touch a telescope or a pair of binoculars, remember the Three-S rule: Space, Stillness, and Shadows.

  • Space: Find the darkest spot in your yard. Even if you live in a suburban neighborhood with streetlights, positioning yourself so that a house or a fence blocks the direct glare of a neighbor’s porch light will dramatically improve what you can see.
  • Stillness: Stargazing is a slow hobby. It takes about 15 to 20 minutes for your “night vision” to kick in. During this time, your pupils dilate to let in more light. If you look at your phone screen (unless it’s on a red-light filter), you reset that clock to zero!
  • Shadows: This is the season of the Lunar Terminator. The “terminator” is the line where day meets night on the Moon. Looking at this line through a “Light Bucket” telescope reveals deep, dramatic shadows in the craters, making them look 3D.

2. The Spring “Anchor” Stars: Finding Your Way

The spring sky is dominated by a few “celebrity” stars that act as your primary landmarks. Once you find these, you can “star-hop” to almost anything else.

The Big Dipper (Ursa Major): High in the northern sky, the Big Dipper is your cosmic compass.

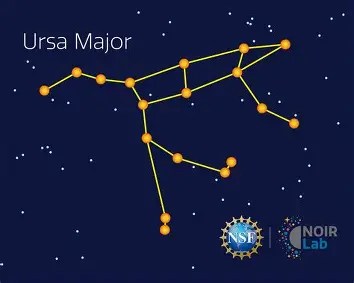
  • The Pointer Stars: The two stars at the end of the “bowl” point directly to Polaris, the North Star.
  • The Arc: Follow the curve of the Dipper’s handle in a smooth “Arc” to find Arcturus, a bright, friendly orange giant. Arcturus is the anchor for the constellation Boötes and is one of the oldest stars visible to the naked eye.

3. The Summer “Signposts”: The Great Triangle

As we move into June and July, the “Spring Diamond” fades, and the Summer Triangle takes over. This is a massive trio of bright stars: Vega, Deneb, and Altair.

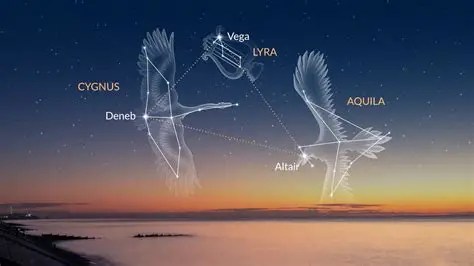
  • Vega: Almost directly overhead and brilliant blue-white.
  • Deneb: Marks the tail of Cygnus the Swan (also known as the Northern Cross).
  • Altair: Marks the head of the Eagle.
  • The Milky Way: If you are in a dark location, the “river” of our own galaxy runs right through the middle of this triangle. This is the best time of year to simply scan the sky with 10×50 binoculars to see “star clouds”—thousands of stars packed so closely they look like glowing dust.

4. Modern Tech: Your Phone as a 2026 Space Tool

We are living in a golden age of “Digital Astronomy.” As we discussed in our “NASA Tool” feature, your smartphone is now a vital piece of gear.

  • Augmented Reality (AR) Apps: Apps like SkyView or Star Walk 2 allow you to point your phone at the sky and see the constellations drawn over the stars. This is the fastest way for kids to learn the difference between a planet and a star.
  • Averted Vision: This is a classic trick every family should learn. When looking at a faint object (like the Hercules Cluster or a comet), don’t look directly at it. Look slightly to the side. The edges of your eyes are more sensitive to light than the center, and the object will suddenly “pop” into view.

5. Targets for the Family: 2026 Special Highlights

  • The Planets: In late spring and early summer 2026, Jupiter remains a stunning target. With a small manual telescope, you can see its four largest moons (the Galilean moons) change positions every night. It’s like a mini-solar system in action!
  • Double Stars: Find Mizar and Alcor in the handle of the Big Dipper. For centuries, this “Horse and Rider” pair was used as an eye test for ancient desert travelers. Can your family see both stars without help?
  • The Hercules Cluster (M13): This is a “Globular Cluster”—a ball of 300,000 stars. In a backyard telescope, it looks like a glowing dandelion puff. It is one of the most popular deep-sky targets for beginners because it is relatively easy to find between the stars of the “Keystone” in Hercules.

6. Recommended Gear for the Season

To make the most of these warmer nights, here are a few “affiliate-ready” suggestions to keep in your astronomy kit:

  • Celestron SkyMaster 15×70 Binoculars: Sometimes, a telescope is too much work for a quick Tuesday night session. These binoculars provide incredible views of the Moon and the Milky Way with almost no setup time.
  • Red Light Headlamp (Black Diamond or Petzl): Essential for reading star charts or adjusting your tripod without ruining your night vision.
  • Smartphone Tripod Adapter: If you want to try your hand at “Astrophotography,” a simple adapter will let you take 10-second exposures of the stars that will amaze your friends on social media.
  • A “Light Bucket” Telescope (8″ Dobsonian): For families ready to see deep-space galaxies and the rings of Saturn in detail, a manual 8-inch Dobsonian telescope offers the best “bang for your buck” in terms of light-gathering power.

Conclusion: The Multitude of the Sky

Stargazing is more than just a hobby; it’s a way for families to connect with something much larger than themselves. When you stand in your backyard and look at the light of Arcturus, you are seeing light that left that star decades ago. You are literally looking into the past.

As we head into the summer of 2026, I encourage you to take at least one night a month to “go dark.” Turn off the screens, put on a light jacket, and remind yourself that the greatest show on Earth is actually happening just above it.

Stan’s Final Tip: “Don’t get frustrated if you can’t find a galaxy on your first try. The ‘hunt’ is half the fun. Even the pros spend nights just wandering the star-fields. The sky isn’t going anywhere—it’s been waiting for you for billions of years.”

The beauty of modern astronomy is that you don’t need to trek to a remote, dark-sky mountain peak to witness the grandeur of the universe. Most of the celestial highlights we’ve discussed—from the craters of the Moon to the brilliant “anchor” stars like Arcturus—are perfectly visible right from a typical suburban backyard. This accessibility turns stargazing into a nightly possibility rather than a rare expedition, allowing families to explore the cosmos in their pajamas. To add a layer of meaningful adventure to your sessions, I highly recommend joining the Globe at Night project. By participating in this citizen science initiative, your family moves beyond simple observation and begins contributing real-time data to NASA and global researchers. It transforms a quiet evening of looking at the stars into a purposeful mission to help protect our night skies for future generations.

Clear skies and happy hunting!

Nature’s Little Helpers: Inexpensive Ways to Create Stunning Scenery for Your Model Railroad (Family-Friendly Edition!)

One of the most exciting parts of building a model railroad is creating a miniature world that feels real. The scenery – the trees, the ground, the rocks, the little details – is what breathes life into your layout and gives it its unique personality.

You might think that creating impressive scenery requires expensive materials from hobby stores. But guess what? You can create amazing landscapes using everyday items from your home and backyard! Not only is this budget-friendly, but it’s also a fantastic way to get the whole family involved in the creative process.

Let’s explore some fun and inexpensive ways to make trees and ground cover for your model railroad.

From Backyard to Background: Making Trees

Trees are essential for adding depth and realism to your model landscape. Here’s how to create them without breaking the bank:

Twiggy Wonders

Your backyard is a goldmine for tree-making materials!

  1. Gather: Collect small twigs and branches of varying shapes and sizes. The more variety, the better!
  2. Prepare: Let the twigs dry out completely. This will help prevent them from warping later.
  3. Customize: You don’t necessarily need to paint them, because they are already the right color! For a more realistic effect, you can drybrush them with lighter or darker shades of brown or green.
  4. Plant: Use white glue to fix them to the layout.

These twig trees work perfectly for small trees and shrubs or can be cut down to resemble logs. This is a cost-effective way to give your model railroad a realistic edge.

Skewer Logs

Did you know that wooden meat skewers from the supermarket aren’t just for kebabs?

  1. Cut: Cut the skewers into varying lengths to resemble logs.
  2. Texturize: Use sandpaper or a knife to create a rough bark-like texture.
  3. Stain: Apply a wood stain or diluted brown paint to give the logs a weathered look.
  4. Arrange: Glue the logs together to create log piles or use them individually to add details to your forest floor.

Sea Foam Forests (and Shrubs!)

Sea Foam, also known as “Forest in a Box,” is a lightweight, twiggy material sold at many hobby stores. But it’s still relatively inexpensive and very versatile.

  1. Prepare: Break off small pieces of Sea Foam and shape them into tree-like forms.
  2. Add Structure: Fine brass wire can be used to strengthen the trunks and branches. Torn-up pieces of masking tape can be wound around the tree trunk to add some width. This can then be sealed with a mixture of wall filler and PVA white glue.
  3. Adhesive: Spray with adhesive.
  4. Foliage: Sieve on some flock (described below.) It is usually best to mix a few little pieces together rather than use just one piece for an entire tree.
  5. Secure: You can then spray the trees all over with matt varnish, or spray them (upside down) with a mix of white glue and water. You then leave them to dry overnight.

Lichen Landscapes

Lichen is a readily available natural material that works wonders for both trees and shrubs.

  1. Gather (or Buy): You may be able to gather lichen from your yard or a park. Make sure it’s okay to do so, and only take what you need. You can also purchase bags of lichen at craft or hobby stores.
  2. Prepare: Break off small pieces and shape them into tree or shrub forms.
  3. Customize: You can purchase it in a range of colors that can be used separately or mixed together. Glue the lichen to your layout to create lush foliage and undergrowth.

From Kitchen to Countryside: Making Ground Cover

Ground cover adds texture and color to your model landscape, creating the illusion of grass, dirt, and other natural surfaces. Here are some easy and affordable ways to make it:

Mulberry Magic

If you have a mulberry tree nearby, you’re in luck!

  1. Gather: Collect fresh mulberry leaves.
  2. Dry: Dry them in a microwave oven.
  3. Blend: After they are dried out, drop them in a kitchen blender and you have instant ground cover!
  4. Store: Keep it in a plastic bag for when you need it.

The best thing is; it costs you virtually nothing to make. The only disadvantage with making your own ground cover is you will not necessarily know how long it will last when compared to the bought stuff.

Herbal Harvest

Dried herbs from your kitchen spice rack can be transformed into realistic ground cover.

  1. Gather: Collect different herbs, such as thyme, oregano, and parsley.
  2. Crush: Crush the herbs into fine pieces using a mortar and pestle or a rolling pin.
  3. Mix: Combine different herbs to create varying shades of green and brown.
  4. Apply: Sprinkle the crushed herbs onto your layout, using diluted white glue to secure them in place. Make sure to lay some newspaper underneath, as it can be a messy process.

This is a quick and easy way to add texture and color to your model landscape.

A Word About Store-Bought Scenery

There’s nothing wrong with purchasing scenery materials from hobby stores! In fact, a lot of model railroaders use a mix of ready-to-use grasses from the hobby store, and combine this with there own home made grass recipe. Many of the ground cover products from a hobby store will have been treated to help them maintain their color and withstand temperature and humidity variances over time. Some of them are non-flammable and nontoxic, so you need to decide what is important to you.

Final Thoughts

Creating scenery for your model railroad should be a fun and enjoyable process for the whole family. By using inexpensive and readily available materials, you can create a realistic and immersive landscape without breaking the bank.

Remember, there’s no right or wrong way to create scenery. Experiment with different materials and techniques to discover what works best for you. Let your imagination run wild and create a miniature world that reflects your unique vision!

As Robert Anderson says, “You just need to be a little creative in your approach. Have fun!”

Now go forth and transform your model railroad layout into a stunning landscape using these inexpensive and family-friendly techniques!

Citations:

References

Here are some helpful resources and references that inspired or support the ideas in the article “Nature’s Little Helpers: Inexpensive Ways to Create Stunning Scenery for Your Model Railroad”:

  1. Woodland Scenics
    Woodland Scenics offers a wide range of products for model railroad scenery, including trees, ground cover, and foliage materials. Their website also provides tutorials and videos on creating realistic landscapes.
    Website: www.woodlandscenics.com
  2. Model Railroader Magazine
    A trusted resource for model railroad enthusiasts, Model Railroader Magazine frequently publishes articles and tips on scenery-building techniques, including DIY methods for trees and ground cover.
    Website: www.trains.com/mrr
  3. YouTube Tutorials
    Many hobbyists share their creative scenery-making techniques on YouTube. Channels like “Luke Towan” and “Marklin of Sweden” provide step-by-step guides for crafting trees, shrubs, and ground cover using inexpensive materials.
  4. National Model Railroad Association (NMRA)
    The NMRA provides educational resources for model railroaders, including tips for creating realistic scenery and using natural materials effectively.
    Website: www.nmra.org
  5. Backyard Inspiration
    Observing nature firsthand is one of the best ways to gather materials and ideas for your model railroad scenery. Twigs, leaves, lichen, and other natural items can be collected responsibly from your own backyard or local parks.
  6. DIY Craft Blogs
    Websites like Instructables and Pinterest are great sources for DIY ideas, including using household items like coffee grounds or herbs to create realistic ground cover.
  7. Books on Model Railroading Scenery
    • “Basic Scenery for Model Railroaders” by Lou Sassi: A beginner-friendly book with practical advice on creating scenery using affordable materials.
    • “How to Build Realistic Model Railroad Scenery” by Dave Frary: A comprehensive guide that includes techniques for making trees, ground cover, and other landscape elements.

These references provide additional guidance and inspiration for creating stunning scenery on your model railroad layout while keeping it budget-friendly and family-focused!