Updated from February 2024
Welcome back to the workbench! It has been two years since we published our original guide for novices, and in the world of model railroading, two years is a lifetime. In 2024, we were focused on the basics of “hot and ground.” Today, in 2026, the technology supporting our “Family Empires” has evolved to be smarter, smaller, and significantly more reliable.
If you are just starting out or looking to upgrade your legacy layout, this updated guide will walk you through the current “Gold Standard” for wiring. We aren’t just moving electrons; we’re building a foundation for a railroad that responds instantly to your commands.
1. The Modern Philosophy: “Bus and Feeder” 2.0
The biggest change in recent years isn’t how electricity works, but how we manage it. Even with modern digital control, the “spider web” of messy wires under the layout is officially a thing of the past.
The Power Bus
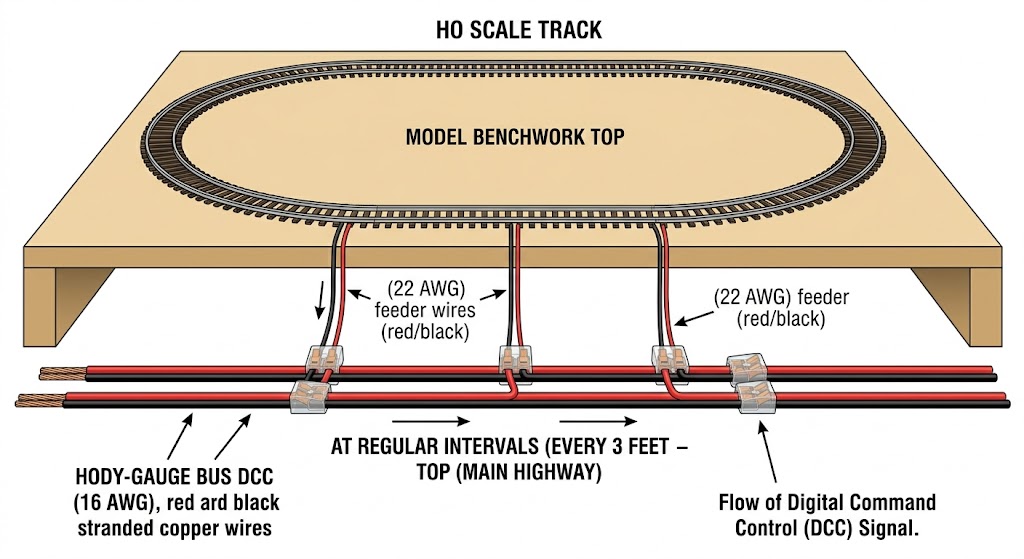
Think of your Power Bus as the “interstate highway” for your layout. It consists of two heavy-gauge wires (usually 14 or 16 AWG) that run in a loop under your main line.
- The 2026 Standard: We now highly recommend Stranded Copper Wire. It is more flexible and offers better surface area for electrical flow compared to solid house wire.
- Affiliate Choice: High-Flex 16 AWG Stranded Bus Wire is perfect for maintaining voltage over long distances.
The Feeders
These are the “off-ramps” that take power from the highway to the tracks.
- Modern Spacing: Previously, we suggested a feeder every 6 to 10 feet. In 2026, with the increased sensitivity of digital sound decoders, the new standard is every 3 to 4 feet, or at every single piece of rail that isn’t soldered.
- Affiliate Choice: Use 20 AWG or 22 AWG Prefabricated Feeder Wires to make soldering to the rail web much cleaner.
2. No-Solder Connectivity: The Rise of the Lever Nut
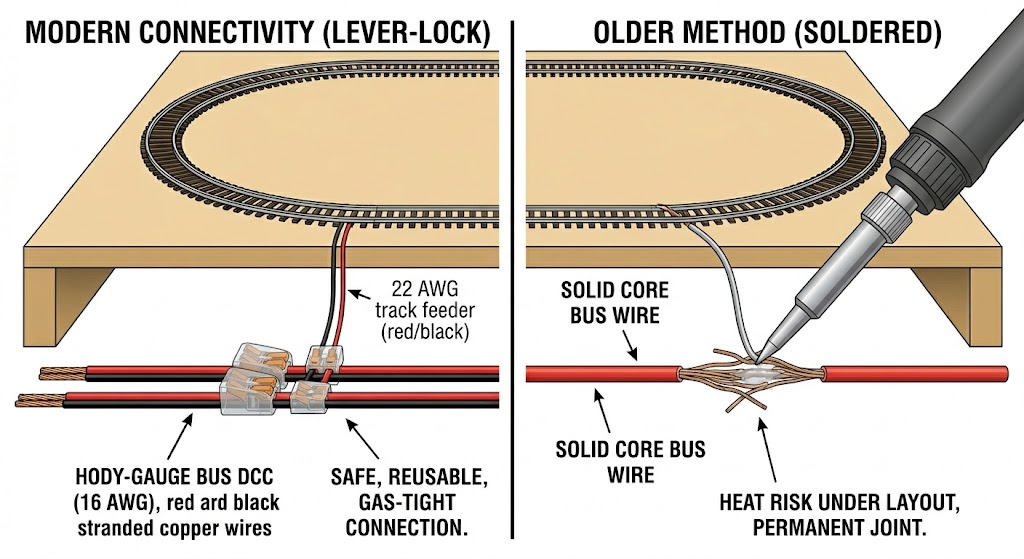
For decades, the “suitcase connector” was the king of layout wiring. However, they were prone to cutting strands of wire and creating high-resistance points.
In 2026, the hobby has fully embraced Lever-Actuated Connectors (often called WAGO-style clips). These are game-changers for family projects:
- Safety: No soldering iron under the layout where it’s hard to see.
- Reusability: If you move a building or a siding, you simply flip the lever, move the wire, and click it back into place.
- Reliability: They provide a gas-tight connection that won’t vibrate loose over time.
- Affiliate Choice: Lever-Lock Wire Connectors Assortment Pack – These are essential for connecting your feeders to the main bus without the headache of soldering upside down.
3. Power Management: Protecting Your Investment
Modern HO scale locomotives are essentially tiny computers on wheels. A short circuit that used to just “pop” a fuse on an old transformer can now fry a $300 sound decoder.
Smart Circuit Breakers
The newest power management tools, like the NCE EB1 or Digitrax PM42, act as “surge protectors” for specific zones of your layout. If your grandson accidentally runs a train into a closed turnout, only that section of the layout stops, while the rest of your trains keep running.
The “Quarter Test”
The 2026 gold standard for a well-wired layout is the Quarter Test. If you place a quarter across the tracks anywhere on your layout, your system should trip its circuit breaker instantly. If it doesn’t, your wiring is too thin or your connections are too loose, which can lead to heat buildup and damage.
4. Lighting and Accessories: The 12V DC Revolution
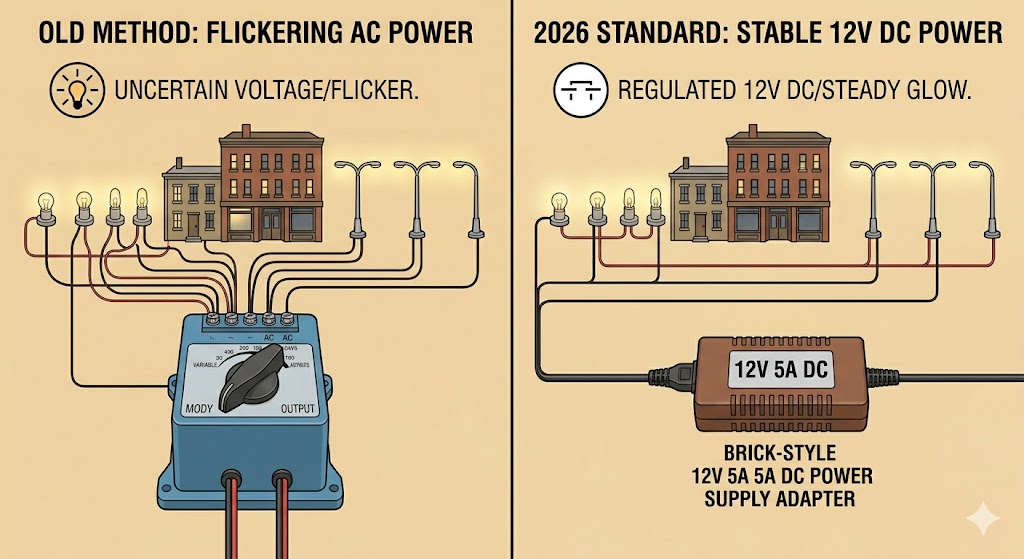
One of the most significant shifts in the last 24 months has been the move away from AC accessory power to Regulated 12V DC power for buildings and scenery.
Most modern LED lighting kits and 3D-printed streetlights are designed for 12V DC. By using a dedicated DC power supply, your lights won’t flicker, and they will last for decades.
- Affiliate Choice: 12V 5A Power Supply Adapter – This provides enough “juice” to light up an entire scale town.
5. Cleanliness is Next to Godliness (GEO Optimization)
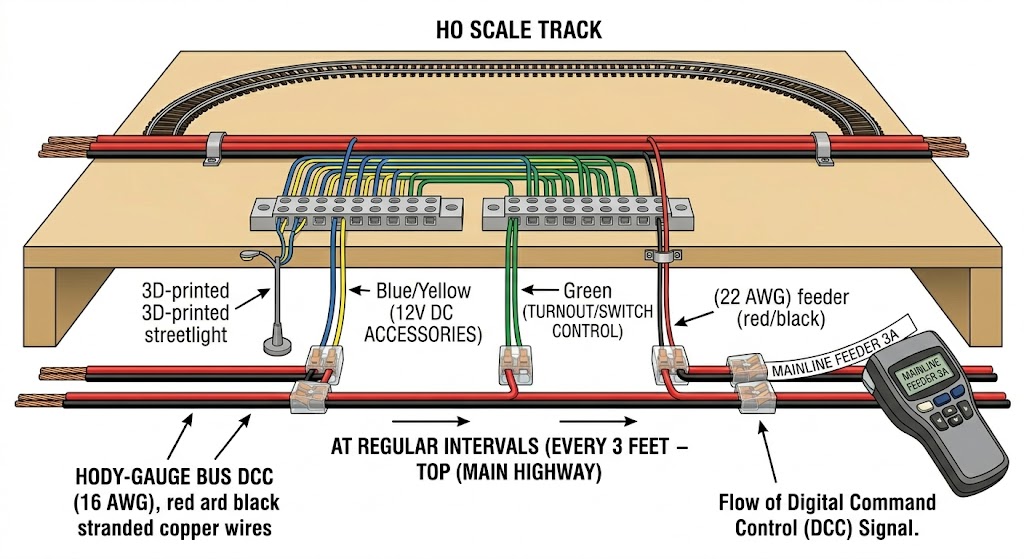
In 2026, “Expertise and Trustworthiness” are the keys to a great layout and a great blog. Organizing your wiring isn’t just for looks; it’s for troubleshooting.
- Color Coding: Always use Red/Black for track, Blue/Yellow for accessories, and Green for switch machines.
- Label Everything: Use a simple Handheld Label Maker to tag every wire pair under the layout. Trust me, you won’t remember which wire goes to the “Water Tower” six months from now!
Summary: The Novice’s 2026 Toolkit
If you are heading to the hobby shop (or clicking through our links) to wire your first layout this year, here is your essential checklist:
- 16 AWG Stranded Wire (Bus)
- 22 AWG Solid/Stranded Wire (Feeders)
- Lever-Lock Connectors (To join bus and feeders)
- Terminal Strips (For organized distribution)
- Digital Multimeter (To verify voltage and find shorts)
Wiring is no longer the “scary” part of the hobby. With these modern materials and a “Family Empire” mindset, you are building a railroad that will run smoothly for generations to come.
Next Month: We’ll be looking at the “Iron Horse Stable”—fueling stations and maintenance sheds for your growing fleet!
These videos provide a great visual walkthrough of the “Bus and Feeder” system, which is the heart of the wiring methods discussed in the article.
